|
Starting the program
On the Main Menu, click the Business tab then click:
P&L Years and Groups - BS409
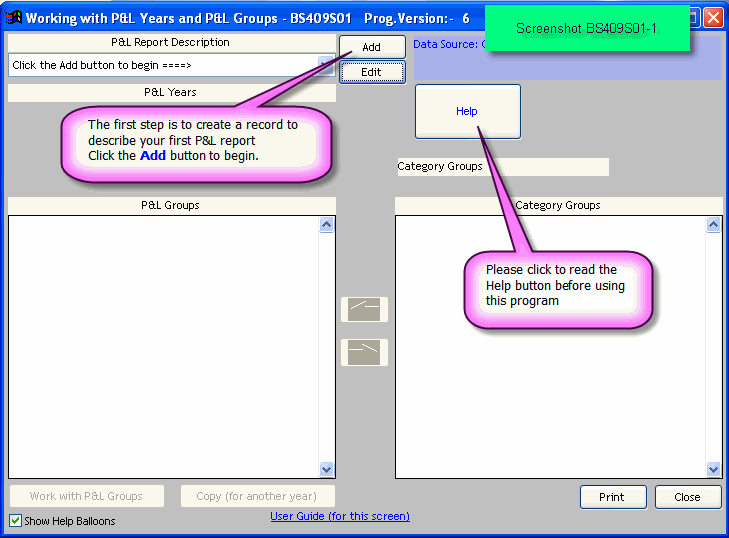
The initial screen
BS409S01 appears
Screenshot BS491S01-1
In this section
About the program
This program allows you to define
the structure for your P&L report.
You then proceed to the P&L report program - BS410
to generate and print the actual reports.
The from/to dates, Banks, categories and tags associated with each P&L Report are stored as memorised reports.
Thus, the reports you generate are stored to disk and previous years can be reviewed by simply clicking a set of Prev/Next buttons.
Bank Genie allows you to generate multiple P&L reports for any given year.
e.g. You may wish to generate P&L reports for Tax Returns in one reporting system where dates begin in one year and end in another. e.g. 2009-2010
You may also be required to submit P&L figures for other organisations e.g. Charities.
The two reports:-
- may or may not be extracted from the same Bank accounts
- may or not have the same start and end dates (referred to as P&L Years in this program)
- may or not have the same accounting categories (referred to as P&L Groups in this program)
The example mentions two reporting systems, but there is no limit.
A typical application would be to create a P&L report to accumulate your transactions
into P&L Groups to match the boxes on a Tax Return for the Inland Revenue
On a Tax Return, the boxes and their descriptions may change from year to
year.
With this program:-
- you may redefine the P&L Groups each year
- you can copy the same P&L Groups and Categories to the next P&L year
- the P&L Groups are independent entities, year to year
P&L reports from Multi-Currency Bank Accounts
If you have multi-currency Bank Accounts, you should create a P&L report for each currency.
Bank Genie allows output to various file formats.
This
allows you to manipulate and merge the output to your requirements.
Step 1 - Creating and assigning a description to a P&L report
Referring to Screenshot BS409S01-1, click on the
Add button
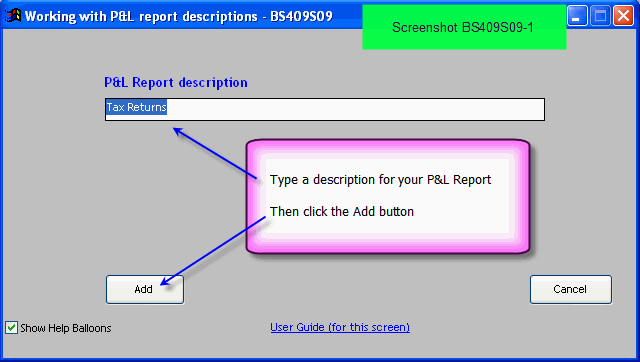
Screen BS409S09 - Working with P&L Report Descriptions
appears
Screenshot BS409S09-1
In screen BS409S09, enter a description for your P&L Report and press the Add button.
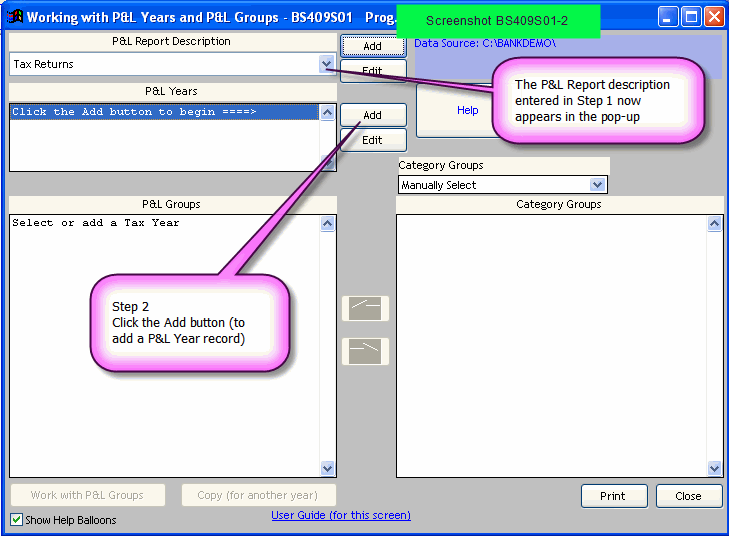
The initial screen BS409S01 appears
Step 2 - Creating a P&L Year record
Referring to Screenshot BS409S01-2 , click on the Add button
(beside the P&L Years popup)
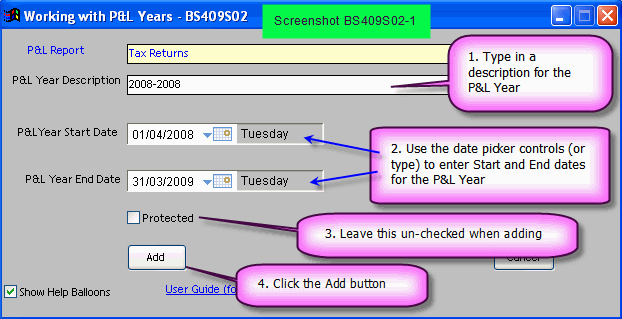
Screen BS409S02 - Working with P&L Years appears
Screenshot BS409S02-1
In screen BS409S02, enter a description for your P&L Year, select or key in Start and End dates and click
the Add button.
The initial screen BS409S01 appears
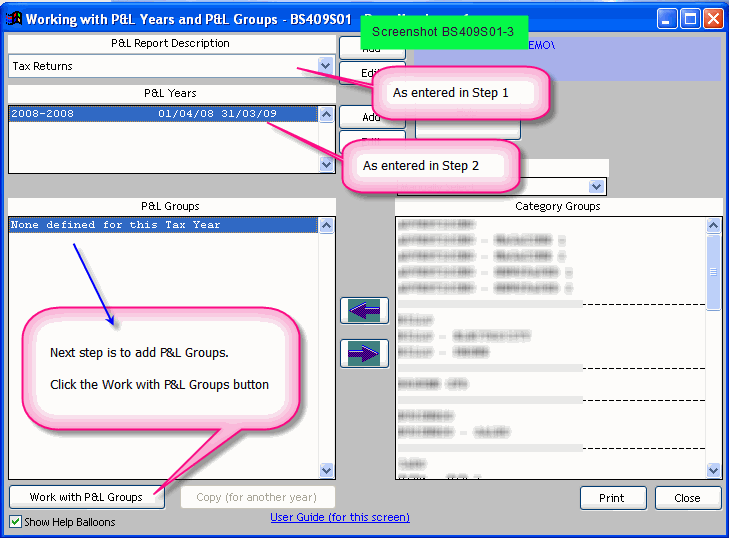
Step 3 - Creating P&L Groups
3(a) - Creating P&L Group names which do not
have the same name as any of your Categories
Referring to Screenshot BS409S01-3 , click on the Work with P&L Groups button
Screen BS409S03 - Working with P&L Groups
appears
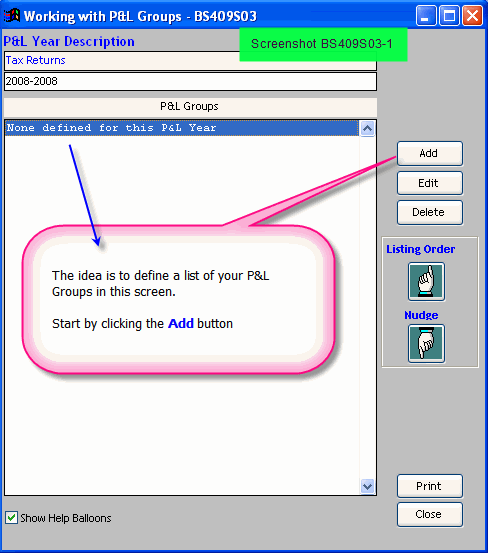
Screenshot BS409S03-1
This workscreen allows you to define a list of the P&L Groups for your P&L
Report.
Referring to Screenshot BS409S03-1 click the Add
button.
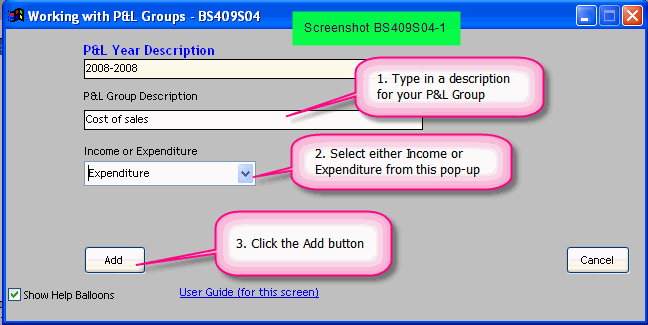
Screen BS491S04 appears
Screenshot BS409S04-1
Type in a name for a P&L Group and select either Income or Expenditure
from the popup.
Click the Add
button
The workscreen BS409S03 reappears.
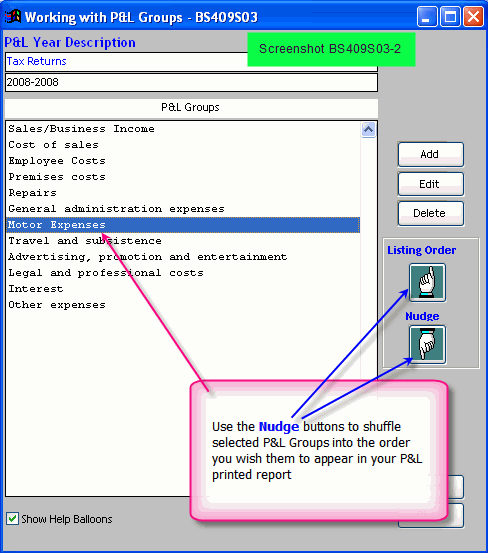
Continue to add more P&L Groups to build up your list.
You may edit or delete any errors by clicking the appropriate buttons in the workscreen.
Use the Nudge buttons as shown in screenshot BS409S03-2 to organise your P&L Groups into the order you want them to appear in your P&L report.
When you have finished adding and organising your P&L Groups, click the Close button
The initial screen of the program (BS409S01) appears.
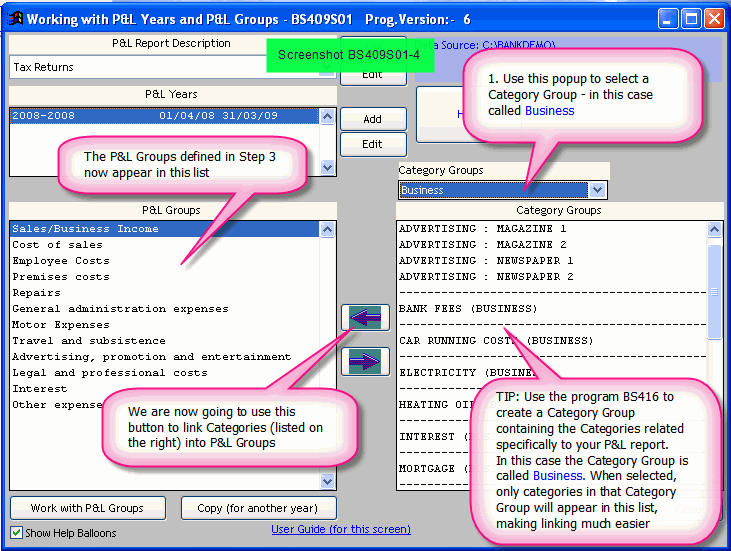
Screenshot BS409S01-4
3(b) - Creating P&L Groups with the same names as your Categories
Step 4 - Linking Categories to P&L Groups
In
this step we will use one of the first power tools available in the P&L reporting programs.
You may have thousands of transactions to link to the P&L
groups defined in step 3 above.
You can link them individually if you wish (in P&L Reports - BS410
).
However! When you added the transactions, you will (most likely) have coded each item to a Category or SubCategory. Step 4 allows you to associate
your Categories with P&L Groups.
When you proceed to use the program P&L Reports - BS410
another power tool will allow you to automatically link all the transactions in your
Categories to your P&L Groups for P&L reporting.
On with the exercise.
Referring to Screenshot BS409S01-4 , select a Category Group to display a filtered list of categories which are specifically related to this P&L report.
If you don’t have a Category Group set up (see Category Groups - BS416) you can use the default setting Manually Select. All your categories will be listed and will be available for selection.
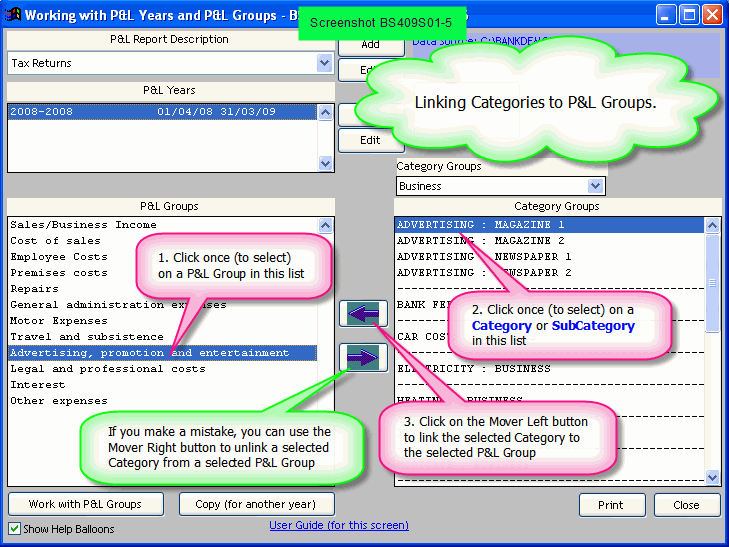
Now refer to screenshot BS409S01-5.
To link a Category to a P&L Group, simply click (to select) a P&L Group on the left,
then click a Category (or subCategory) on the right.
Click the Arrow left button between the two lists (referred to as the Mover Left button)
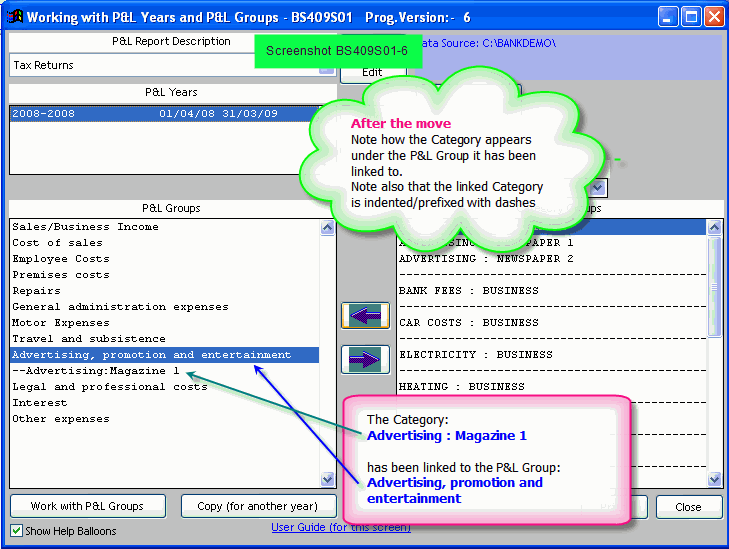
After you have
linked a category to a P&L Group, the screen will look something like this:
Screenshot BS409S01-6
Note that Categories
linked to P&L Groups are removed from the Category list and are located under P&L Groups.
Continue to link your categories to P&L Groups.
If you
have selected a Category Group designed for this P&L report, then continue until the Category list is empty.
Otherwise, select only the categories which
contain transactions for this report.
After you have linked all categories in a Category Group to P&L Groups, the screen will look something like this:
Screenshot BS409S01-7
Note: At this stage, Transactions have NOT been linked to the P&L Report.
The ground work has
been done. You may now exit this program and use the program P&L Reports - BS410
to generate your P&L Report
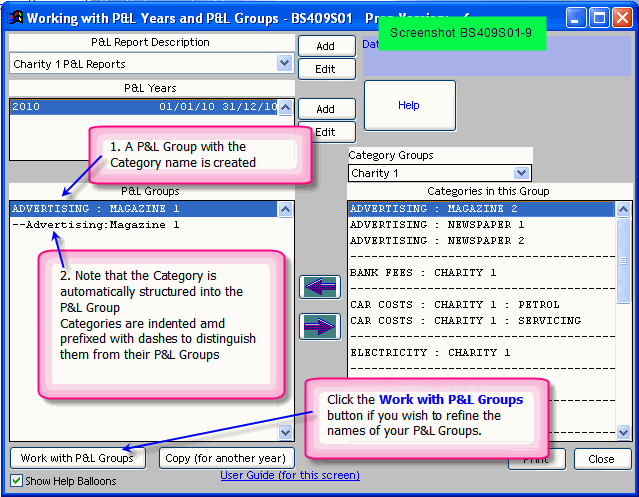
Creating P&L Group names from Category names
You can use a special feature in this program to create P&L Groups
with the same name as your Category names. Category names are defined in the program Categories BS420
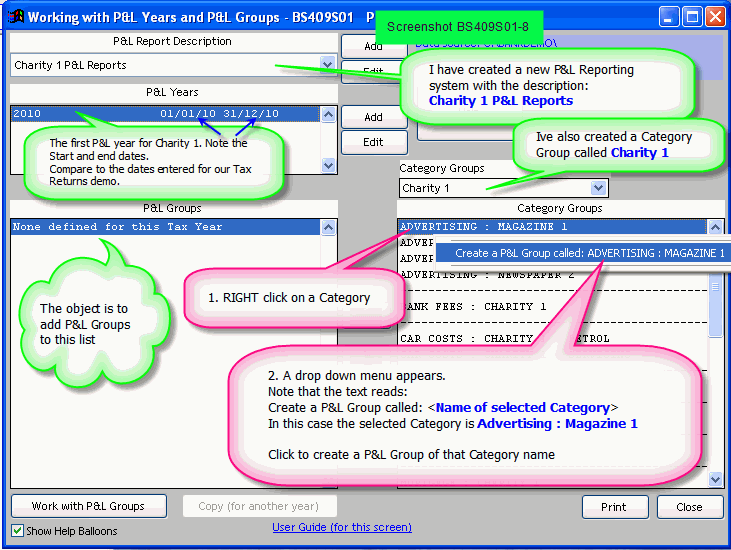
Referring to Screenshot BS409S01-8
- I have created a new P&L Report system - Ive called it Charity 1 P&L Reports
(in
addition to the one described in Steps 1 to 4 above)
- Ive added a P&L year - 2009
- for that reporting system
Note that date range is also different for this reporting system
- I have created and selected a new Category Group called Category 1
Category groups are created using the program Category Groups BS416
The process:
Right click
on a Category in the list on the right
A menu appears
Click on the option Create a P&L Group called: <Name of selected Category>
Two things will happen.
Screenshot BS409S01-9
- A P&L Group with the <Name of selected Category> will be created
- The Category will be automatically linked to the new P&L Group
NOTE: Even though 1) and 2) have the same name they are entirely different entities.
You may continue to create more P&L Groups using a mixture of
the techniques (i.e. as in Step 3 and as in this alternative method)
You can also link categories to P&L Groups independently as described in Step 4
above.
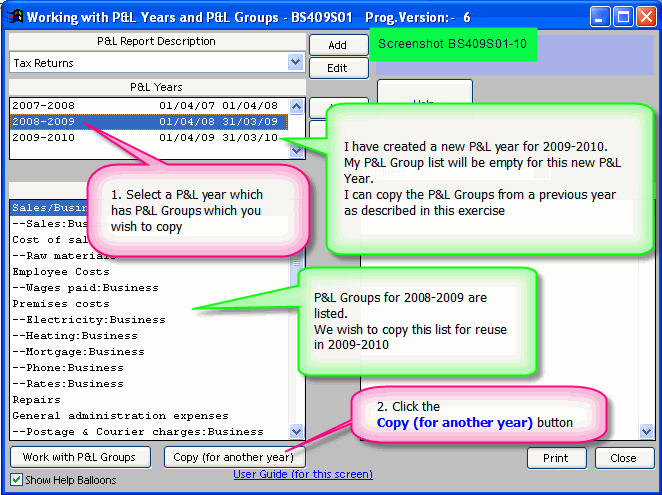
Duplicating P&L Groups for another P&L
year
As explained previously, the list of P&L Groups are unique to any one P&L year.
This independence allows you to cope with changes in
the reporting groups demanded by authorites from year to year.
You can (if necessary) repeat Step 3 above for another P&L year.
If the P&L Groups for
the following year are similar you can duplicate any set of P&L Groups for a subsequent P&L Year as follows.
- Select a P&L report system and a P&L Year which has P&L Groups to be copied
- Click the Copy (for another year) button
(This button can be seen in Screenshot BS409S01-10)
- Screen BS409S05 appears
Screenshot BS409S05-1
- In screen BS409S05, select a P&L Year to receive the copied P&L Groups
- Click the Go
button
(P&L Groups and linked Categories are copied and applied to the other P&L year)
- Control returns to the initial screen
- Select the Other P&L year
The P&L Groups and their Categories are displayed
Now continue to read the User Guide for the program P&L Reports - BS410
|
