|
Starting the Import program
On the Main Menu, click the Tools tab then
click Import QIF files - BS419
Screen BS419S01 will appear
Screenshot
In this section
About this program
This program allows you to:
- Import files from Quicken to Bank Genie
The Quicken database is unaffected by this process so the two databases can, if necessary, be used in parallel for
an overlap period.
- Import files from MS Money to Bank Genie
The MS Money database is unaffected by this process so the two databases can, if necessary, be used in parallel for
an overlap period.
Acknowledgements
The instructions for Quicken on this page were written by
Barry Landy.
Barry was the technical advisor in the creation of the Import QIF Files Program and carried out numerous tests in each stage of the development. A
wide range of his Quicken accounts were tested to ensure all known data record types could be successfully imported to Bank Genie Pro.
The instructions were
revamped for MS Money users.
Preparation of the Quicken database
- Make sure that all the Quicken accounts are completely reconciled
To reconcile bank accounts open the
account to the register display then use the current bank
statement to reconcile up to the last date in that statement. Any remaining transactions will be
correctly handled as Un-Reconciled by Bank Genie.
If no bank statement is to hand, note the final total in the register then click the reconcile button
in the register header. Enter the noted total in the ending balance field, and click reconcile.
Then click all presented transactions. In this case all
transactions will be treated as Bank Genie as reconciled, which may be wrong, so the first approach is better.
For cash accounts (which are often not
reconciled in Quicken as there is no standard
mechanism, click in the Update Balance
button in the header then specify the displayed final
total and all items will be reconciled.
- Transactions which are later than the last statement may (and probably should) be left unreconciled (and Bank Genie will deal correctly with them)
- Make sure that all transactions have valid categories or subcategories.
To search for uncategorised items
- which are easy to accumulate by mistake - click on Reports (in the toolbar) - Other in the pull down and then Transactions. In the Custom date pull down click Earliest to date and then (on the bottom line) Customise.
In ACCOUNTS click Mark All
In INCLUDE click Clear All and then click on Not categorised
If there are any uncategorised items they will be displayed and a category needs to be assigned
to each one.
- Check to make sure that there are no Slashes in your Category names
Slashes in Category names will cause this error if you attempt to do an import
- Foreign Currency accounts
If you have any foreign currency accounts Bank Genie will deal correctly with
transfers between these and the main currency provided there are no splits in the transfer.
Check all transfers to or from foreign currency accounts and if
there are any splits temporarily replace by a single transaction (taking careful note of the details of course so that they can be recreated later).
Exporting the data from Quicken
- With the database open in Quicken, click on the File pulldown, then click on File Operations
, and finally on Export (the short-cut sequence is alt-F, F, E).
The QIF export screen opens.
Note:
In Quicken 2004 Export is not in File Operations but at the same level as File Operations
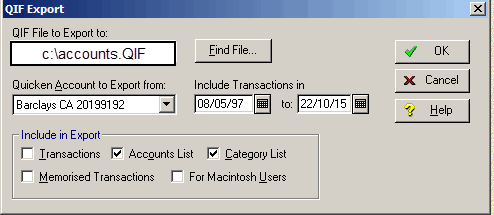
- Export the account names and categories
In the File box type a suitable name (eg C:\accounts.qif).
Screenshot
You may also use Findfile
to browse.
If writing to a folder (recommended) the folder must already have been created.
In the Include in export
section unclick transactions and click Accounts list and Category list
. The name of the account in the Quicken account box does not matter.
Then click on OK
and the data will be copied to a QIF file.
- Select a Starting Date
This may be the same as the opening date of the account, but it may be much more recent.
Once chosen, make sure that all items
which appear on the first statement are included in the chosen date range (because of delays in cheque handling both by people and by banks the date on the
cheque and the date it appears on a statement may be very different).
Make sure that all cheques written earlier than the starting date appear in
statements before the starting date.
If such a cheque appears on a later statement it is probably easiest to alter its date to be later than the starting
date so as to ensure it is included in the export.
- Export all the accounts
For each account enter the Export Screen (as above - alt-F,F,E), select one account, set the name of the QIF file (it is
strongly recommended that this is EXACTLY the name of the account followed by .QIF in the same folder as the accounts list).
Ensure the Transactions button is the only one selected, set the starting date (it will default to the first date in the file) then click
OK.
- When all those are done, leave Quicken.
Exporting the data from MS Money
Preparing to export your data from MS Money
Open MS Money
- First, Check to make sure that there are no Slashes in your Category names
Slashes in Category names will cause this error if you attempt to do an import
- Finalise housekeeping of your accounts prior to export by updating the Cleared status of your transactions - Refer to this Screenshot
Export your data from MS Money
- Make a folder to receive your exported data.
If MS Money and Bank Genie are on the same computer, make the folder on your hard disc.
If not, make a
folder on a removable device - a Flash disk/Memory stick is perfect.
- Under the File tab on the menu, look for the option to Export data.
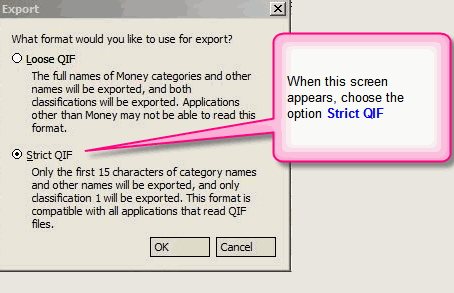
Choose the QIF file format.
A dialog box will appear asking you What format would you like to use for export
Screenshot
Choose Strict QIF
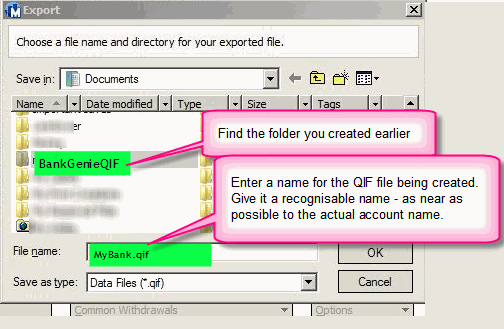
- Another dialog box appears. You are asked:- Choose a file name and directory for your exported file
.
Follow the suggestions in this screenshot
NOTE: Save each file with a name which clearly identifies the
account to make it easy when you proceed to import this data to Bank Genie.
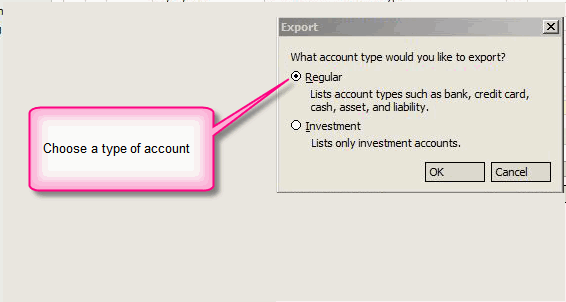
- Another dialog box appears. You are asked:- What account type would you like to export
Screenshot
Choose an account type
Note: At the time of creating this document, Bank Genie does not allow the file type
Investments.
The software is currently being revised to provide this feature.
Check
with ideasforgardens.com for latest status.
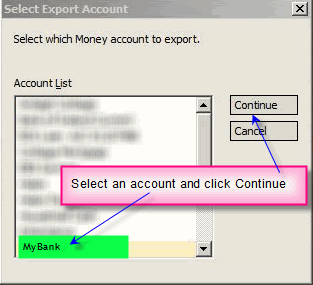
- Another dialog box appears. You are asked:- Select which Money account to export
Screenshot
Make your selection
(You can only export one Account at a time from MS Money)
- The export will execute and the QIF file will be created.
-
You can export and save the QIF files for all your accounts (one at a time) in one session and then import your data from these list of QIF files when you proceed to import your data to Bank Genie below.
Importing these files into Bank Genie
- Normal practice is to import your data to the Bank Genie Core folder (the folder where Bank Genie installed your data files on
installation).
Alternatively, you may wish to create a new database for your imported data.
This is entirely optional.
If you decide to create a new database, use the program Create a new database - BS496.
To avoid confusion this ought
to have the same name as the Quicken database. Set up any necessary permissions if database security is wanted, using the programs Set
Password Protection - BS424 and Working with Security Names BS414
- Start Bank Genie Pro.
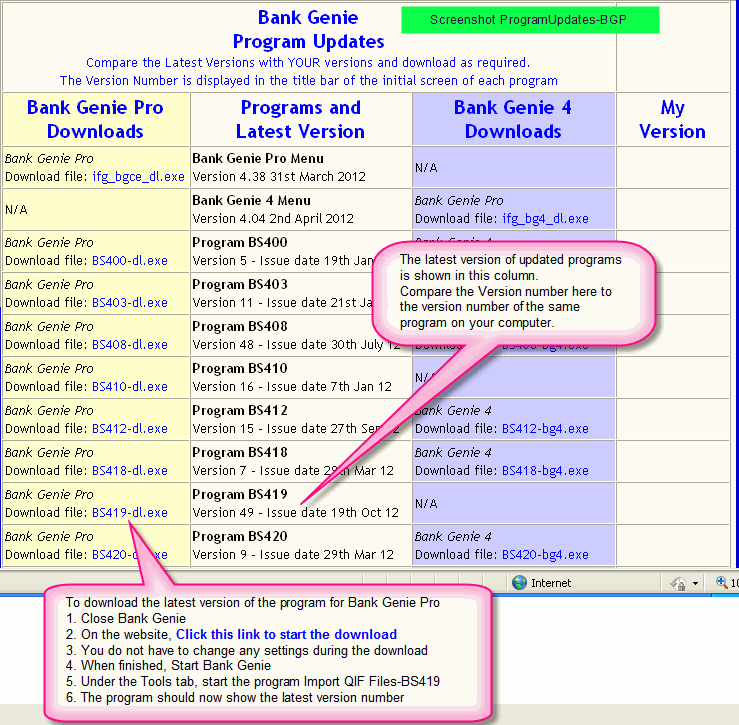
In the TOOLS tab on the Main Menu item, start the program Import QIF Files-BS419.
The version number is shown in the title bar of the initial screen.
Screenshot
The Import Program-BS419 changes occasionally, and updates can be downloaded easily.
To check if you have
the latest version:
a) Observe the version number when you start the program
b) Compare your version number (use the Back button after checking) with the
version number of BS419 on this Program Updates page
Help me do this
c)
download the latest version of BS419 if necessary
This screenshot explains how to compare versions and how to download a latest version.
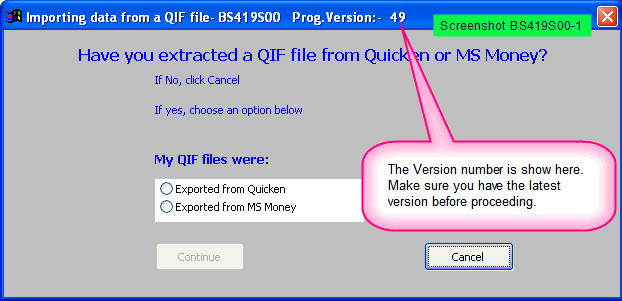
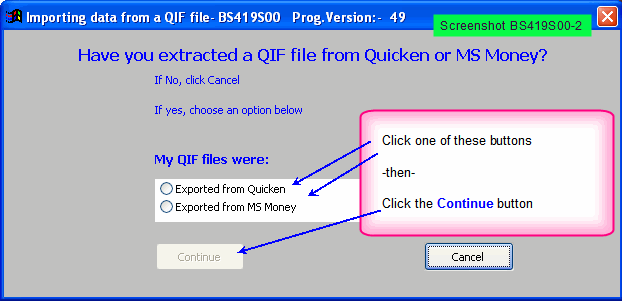
- If necessary, restart Bank Genie and start the program Tools (tab)>Import QIF Files-BS419
Screenshot
Click either Exported from Quicken or Exported from MS Money, then click Continue.
Screen BS419S01 appears
Screenshot
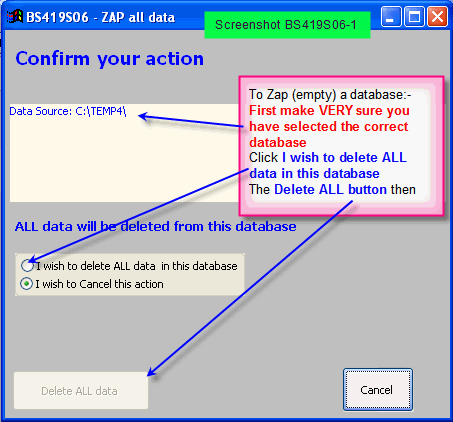
At this stage ON THE FIRST IMPORT ONLY
, click the ZAP button to clear the database.
Screenshot
Be VERY careful. Make sure you have selected the correct
database, as ZAP is irreversible.
All Accounts, Categories and Transactions will be deleted from the database, leaving an empty database to receive your
imported data.
You should use the ZAP If you have made a mistake in a previous import and wish to start again.
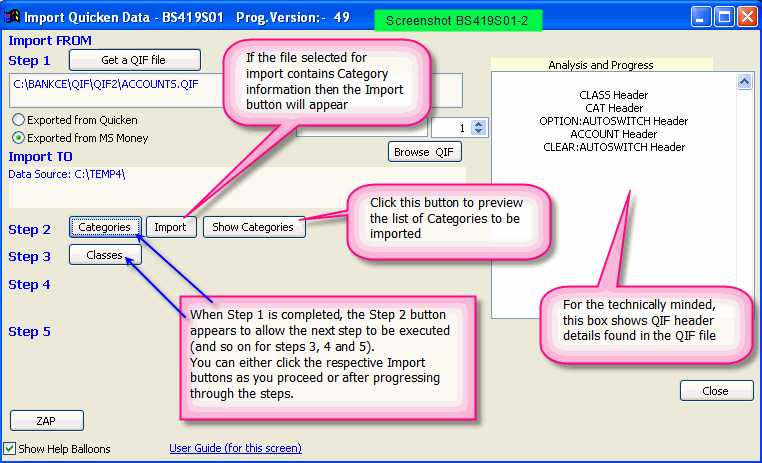
- Step 1
Click the Get a QIF file
button and browse to the account list exported above. (double click on the file name or click OK). Bank Genie will verify the file and create a button with the caption
Categories.
- Step 2
Click on the Categories button and a dialog box should appear saying the scan was
successful and how many categories were created.
Click OK. More buttons are shown.
If the file contains
Categories, opposite the Categories button are Import and Show categories
Screenshot
If
you wish to check that everything looks right, click Show Categories
When happy click Import and the categories will be added to the database.
Click OK and the Import
button vanishes.
- Step 3
Beside Step 3, a button with the caption Classes
now appears.
Click the Classes button to import these in the same way as Categories.
If visible (when
you have Classes to import) click the Import button for Classes.
- Step 4
Beside Step 4, a button with the caption Accounts
now appears.
Click on that to import accounts in the same way as the earlier imports.
If visible (when you have Accounts to import) click the Import button for Accounts.
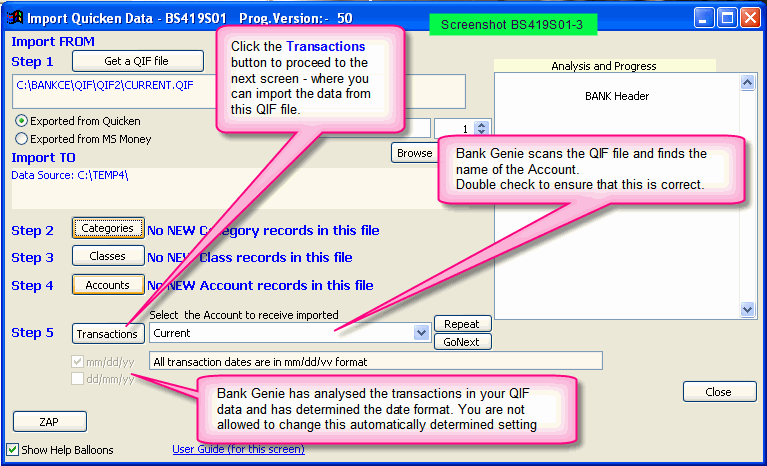
- Step 5
Beside Step 5, a button with the caption Transactions
now appears.
Screenshot
A dropdown list also appears. This contains a list of all Bank Accounts which have been
imported at this moment.
Bank Genie automatically scans the QIF file. If the file contains transactions, Bank Genie will automatically set the dropdown list
to show the name of the account you are importing.
(Verify to make sure you agree - adjust if necessary).
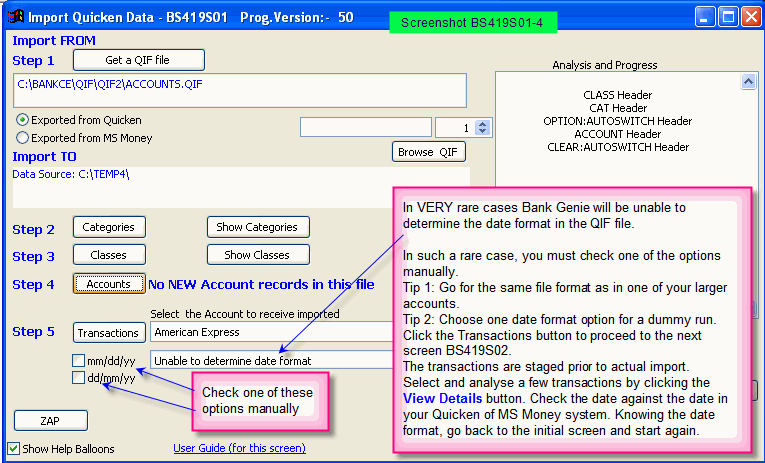
Note: If your QIF file contains only a few
records, Bank Genie may be unable to determine the date format used in the QIF file. Follow the tips in this screenshot.
Click
the Transactions button.
Note:
If Bank Genie stops the
import of transactions with a warning message, there is most likely a problem in the data being imported.
Check the list of known problems and the solutions
to known problems on this page.
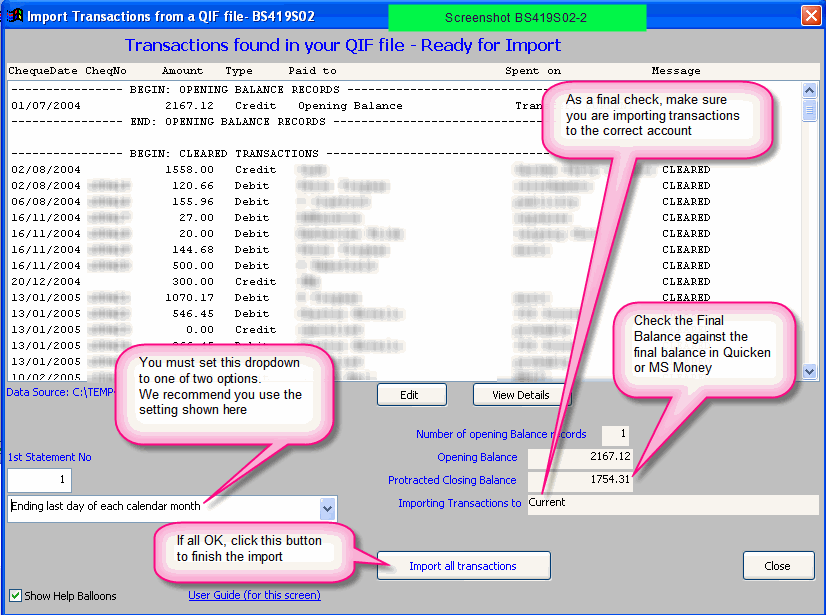
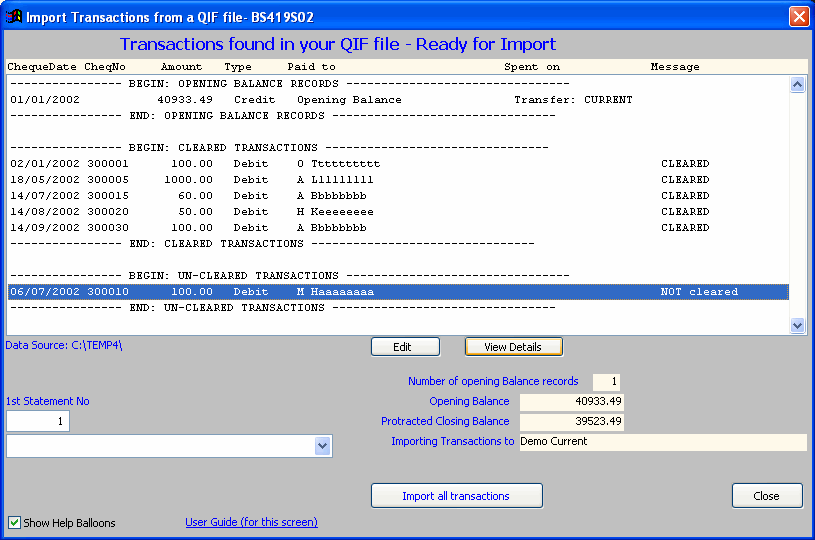
If all is well, Screen BS419S02 appears.
Screenshot Another Screenshot
This is a staging screen, where you can
view and verify the data before actual import.
All the transactions are displayed. This staging screen allows you to choose options to deal with the
transactions to be imported.
The options are described in the page for Screen BS419S02.
Included
are options to fix in the rare instances where Bank Genie has reported that you have problems (e.g. multiple Opening Balances)
When importing the
first account choose whether to have the transactions split month by month and reconciled or whether to leave them unsplit and reconcile later, using the
standard method in Bank Genie after imports are finished.
Refer to this Screenshot
The mechanism relies on the Cleared/Uncleared status of the transactions in your QIF file. Click to read more about this.
Check that a) the closing balance is correct and b) you are
importing to the correct account.
Then click the button Import all transactions
- Quicken Users ONLY:
If there are no Transactions in the file, you need to move on to the
next file to be imported.
Click Get a QIF file
again which will still be pointing at the accounts QIF file.
Pick the first account (alphabetically) and open it. Bank Genie will scan for categories, classes
and accounts as above and will find none, and will then show a button
Transactions.
If a warning that the date format could not be determined is shown click on the appropriate
format e.g. mm/dd/yy for UK accounts.
ALL USERS
- A check box then shows asking if there are more QIF files to import; click yes except on the last one.
If No
is clicked by accident, just enter the QIF import program again from the menu.
- Do this for every account, making sure you import into the correct Bank Account in Bank Genie.
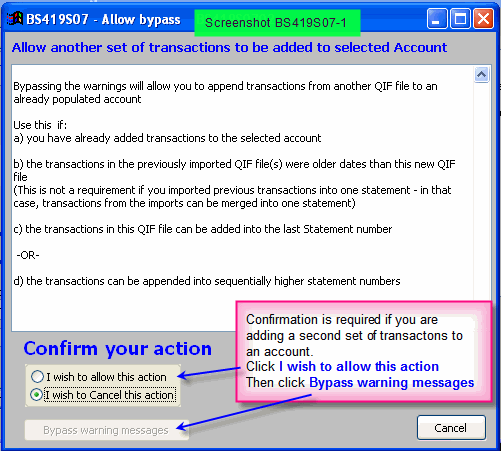
- Bank Genie will ask for permission (dialog box) if you attempt to import transactions into an account which already has transactions.
This feature may be
useful if the Quicken data is split into more than one dataset (Quicken has some limits on size - Bank Genie does not) in which case more than one file will be
imported to one account.
In this case we advise completing the first import (including FIXing (see below)); backing up the resulting Bank Genie dataset,
and then importing the second set of files, following the description above.
For every account which already has transactions a warning will appear and
you will be asked if you wish to bypass the warnings.
Screenshot
Check that you are doing the right thing and select Bypass warnings
- When all accounts have been imported, exit the import program.
Foreign Currencies
The currency of imported
Bank accounts cannot be determined in an import from Quicken.
Bank Genie sets the imported Bank Accounts to GBP by default.
After Import:-
- you use the program My Bank Accounts - BS403 to set the currency for each of your Bank Accounts.
- you use the program Broken Transfers - BS422 to link up transfers between accounts with multiple currencies.
- Bank Genie allows you to manage any number of accounts and any number of currencies.
Exploring the Imported Data
You may now use Bank
Genie to examine the results of the imports.
Use the program Manage Transactions - BS421 to view and if necessary edit your transactions.
Use the program Transaction Analyser - BS408 to view your transactions, execute queries and produce reports based on a wide range of user selectable parameters.
YOUR WORK IS NOT DONE.....
Broken Transfers.
Assuming that your quicken database had Transfers the source and destination of each
transfer will not be matched up.
It is impossible for Bank Genie to match Transfers until all transactions from all Accounts have been imported.
During
import, transfers are recognised and will have been given the special category BROKEN TRANSFER
When all
accounts have been imported, use the program Broken Transfers - BS422 to match (Fix) the broken transfers
On the Main Menu, click the Tools tab and start the program
Broken Transfers.
The program will:
- show you a list of credits and debits
- attempt to automatically pair them up.
- show you a a list of matching pairs.
Click the Fix
button at the bottom.
Broken Transfer transactions which can be fixed automatically should now be fixed.
The list of debits, credits and matched pairs will be refreshed.
If some matching pairs are displayed, click the
Fix button again. Repeat until the program reports that 0 Transactions were fixed
The remaining transactions can be fixed manually, using the Manually Match feature in the Broken
Transfers program.
See Manually matching Broken Transfers
The Import process is now complete and you should examine the
database to see if it appears to be correct.
Reconciliation
Use the program Manage Transactions - BS421 to reconcile and organise your Accounts into Statements
If not broken up into statements, the data in Manage Transactions-BS421
can be too cumbersome, as most recent data is at the bottom of what may be a long list of transactions.
Referring again to this Screenshot if you took the option Ending last day of each calendar month
when doing the import, your data will be broken into “best attempt” statements.
You can unreconcile if necessary and reconcile again to match your latest actual statements.
If not, the transactions will now need to be split into appropriate groups to either a) match your actual statements using the reconciliation process or b) break up the data into fictitious statements ending on dates you choose.
For Credit Card accounts, you may wish to use a special feature in Bank Genie where, instead of Statement Numbers, you can have statement month names to identify each statement, as commonly used by Credit Card providers- e.g. October 2012, November 2012 etc.
If so, go to SETUP/
My Bank Accounts - BS403 and click the checkbox Allow statement numbers to be edited
Tip: When you use the Manage Transactions program, predictive text will help you enter
statement references.
Standing Orders, Direct Debits and regular payments
Standing orders, Direct Debits
(and other types of repeating transactions) do not get transferred and will need to be recreated in the Bank Genie environment.
Use the program Direct Debits and Standing Orders - BS423 to set up these regular payments.
Screens (leading to screenshots) for program BS419
- BS419S01 - The initial screen - This page
- BS419S02 - Transactions found in your QIF file - Staged and ready for Import
- BS419S03 - View an individual transaction - prior to Import
- BS419S04 - Options screen - How Import should deal with an Opening Balance transaction
- BS419S06 - Confirmation screen ZAPPing data
- BS419S07 - Confirmation screen - Allow bypass
|
