|
A VERY quick look at Bank Genie... we will refer to
the Menu options, top of screen.
Are you very impatient? Start Bank Genie and click the Screenshot
links below.
If you have time, follow up by clicking Read more about it
(You will learn more from the tips)
- Maximise the Menu screen VERY important
Screenshot for a Single monitor setup Read more about it
Screenshot for a DUAL MONITOR setup Read more about it
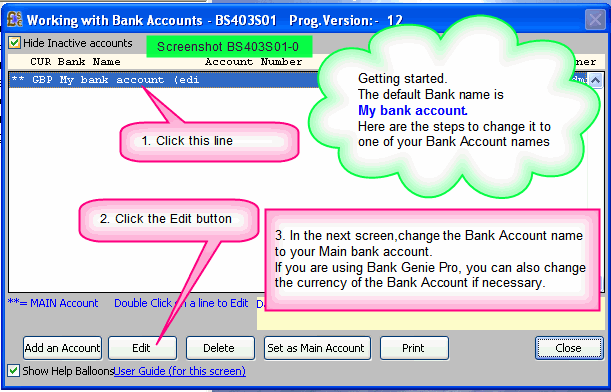
- Start the program Setup>My Bank Accounts Screenshot
Edit the default Bank account name - make it your primary account name
Screenshot Read more about it
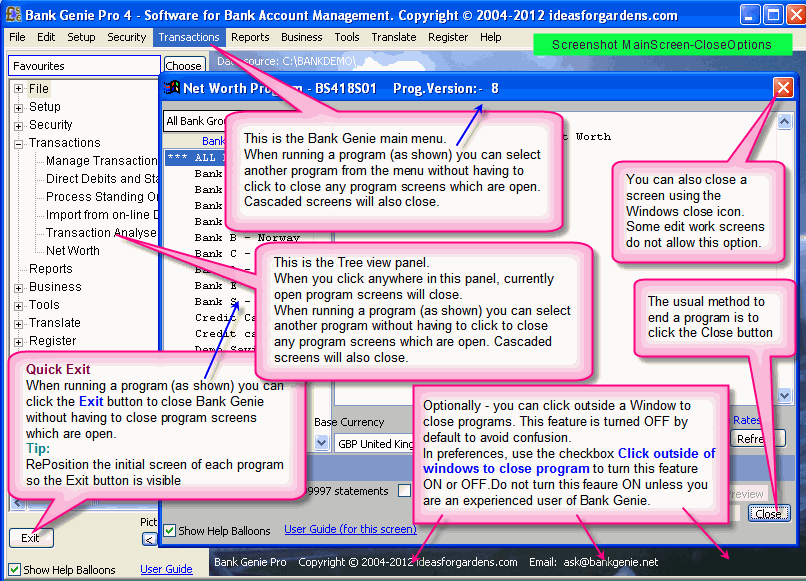
- Closing Programs Referring to this screenshot - there are three methods for closing programs.
Read more about it
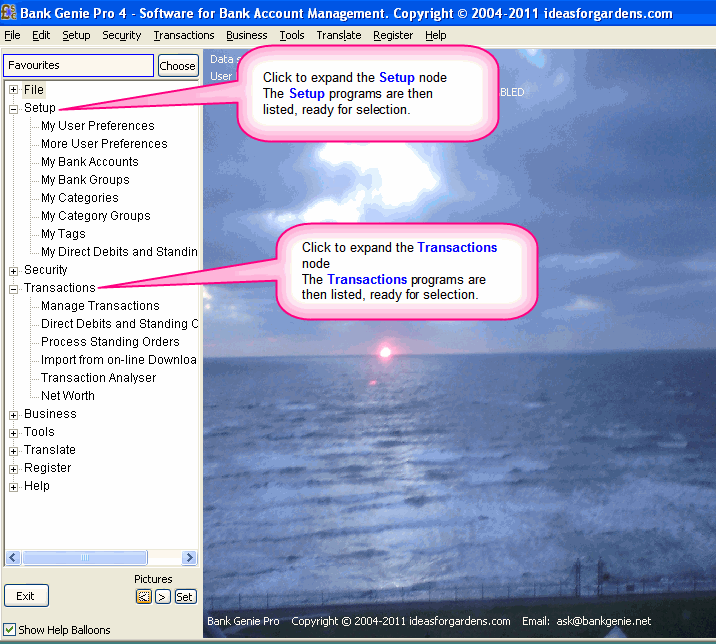
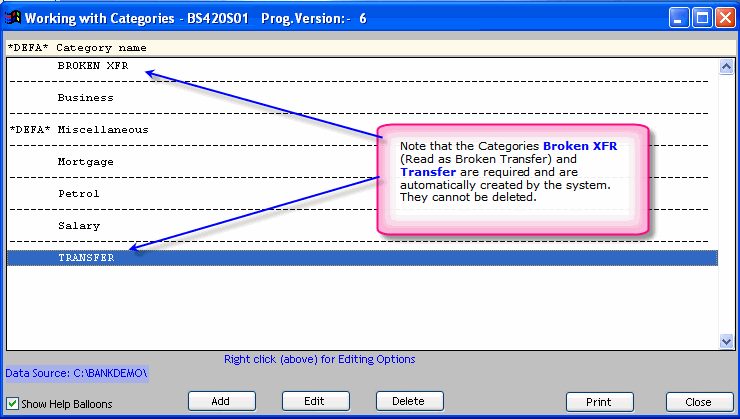
- Start the program Setup>My Categories Screenshot
Add some Categories (e.g. Salary)
Screenshot Read more about it
Tip: Add a Category called Miscellaneous.
When added, right click on the Category and from the shortcut
menu, click Make default
The default category will be automatically selected when you
start to manually add transactions below.
- Exposing Help (Unlike most Help systems its quick, easy and TO THE POINT!!!)
Screenshot 1 Screenshot 2 Read more about it
- Start the program Transactions>Manage Transactions Screenshot
Add some transactions manually (Click the buttons Add Debits and Add Credits)
Screenshot Read more about it
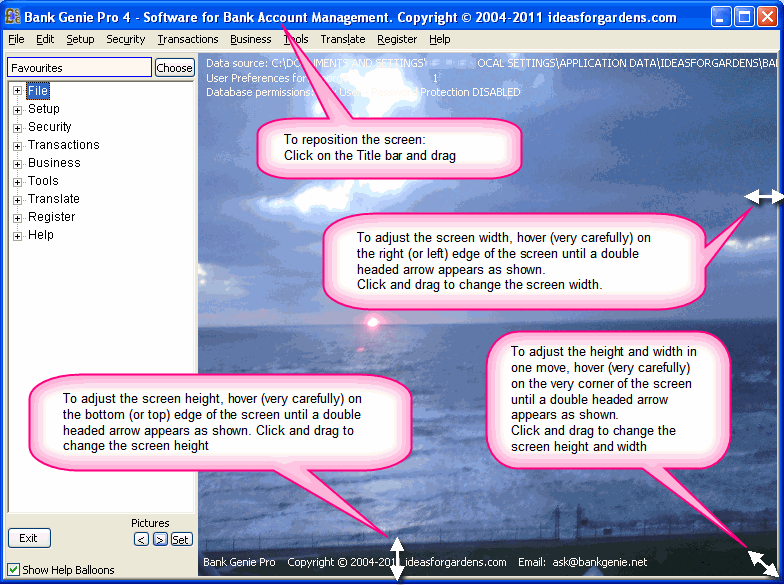
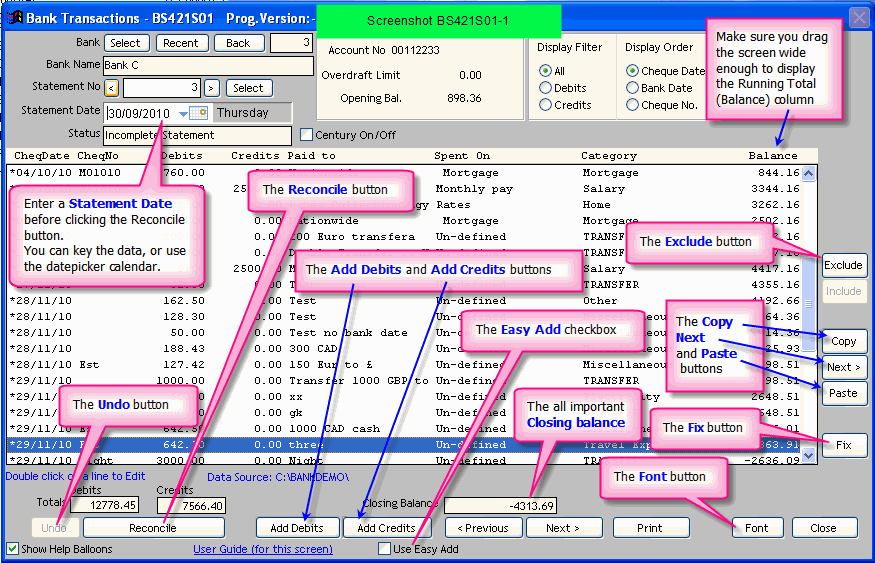
FIRST: The screen in this program is one of the widest in Bank Genie.
You need to ensure you can see all columns (e.g. the running total)
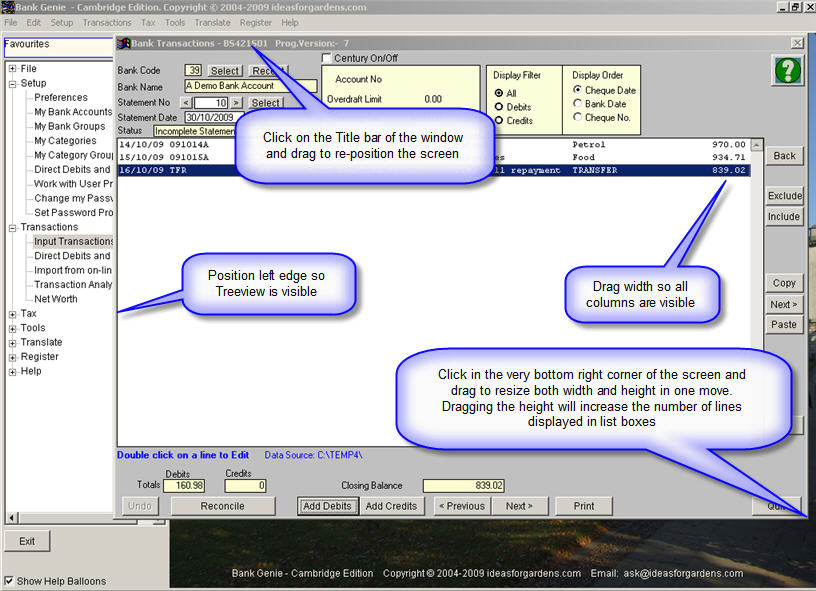
View these screenshots to learn about repositioning and resizing screens
Repositioning and Resizing a screen
Before repositioning
After repositioning
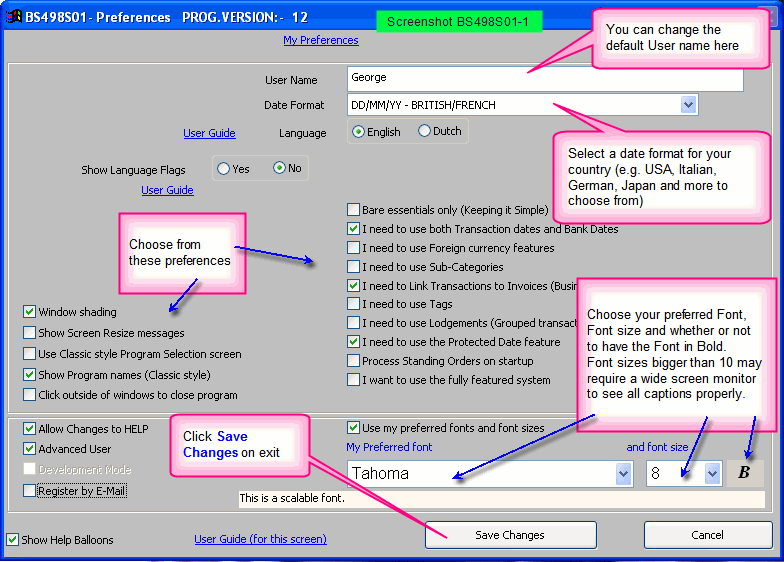
- Start the program Setup>My User Preferences Screenshot
Choose a Font and Font size (optional - the default is 8pt Tahoma)
Screenshot Read more about it
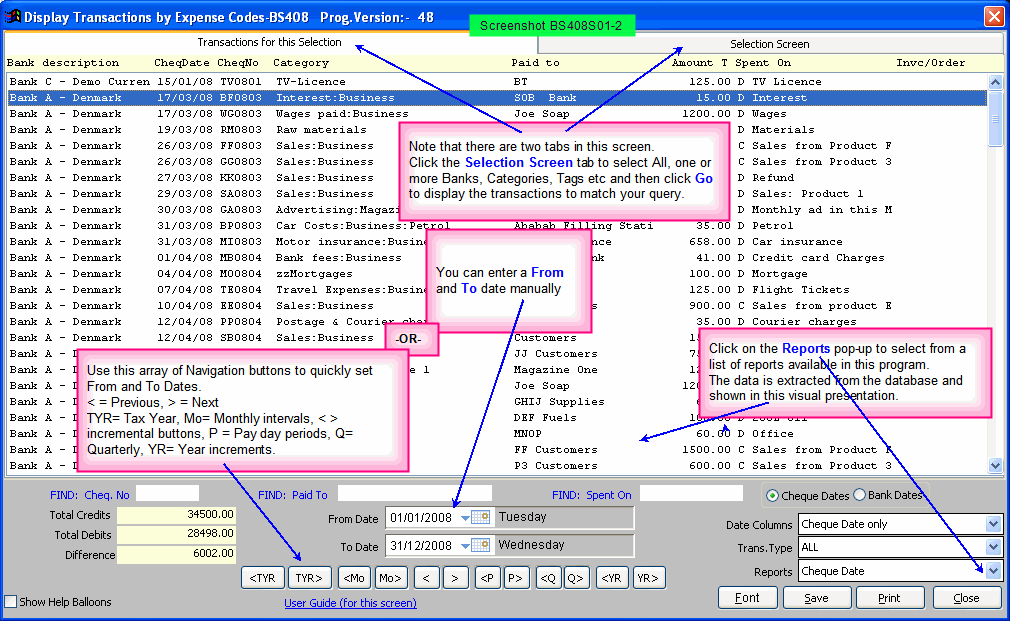
- Start the program Transactions>Transaction Analyser
Screenshot
Play with the Transaction Analyser
Screenshot Read more about it
- Reports (using the Transaction Analyser
Screenshot Screenshot-After Right click on TYR Read more about it
- You’ve covered the basics.
Now try these programs yourself (refer to User Guide for assistance if
necessary):
Transactions tab>Direct Debits/Standing Orders-BS423
and its
counterpart
Transactions tab>Process Standing Orders-BS429
then:-
Transactions
tab>On line banking transactions-BS412
Even more...
- Tips - and things you should know
Read more about it
- About the User Guide
- Questions? Try the FAQ
- Glossary of terms e.g. What are tags (in Bank Genie Pro)
- Explore the User Guide by using the links on the left
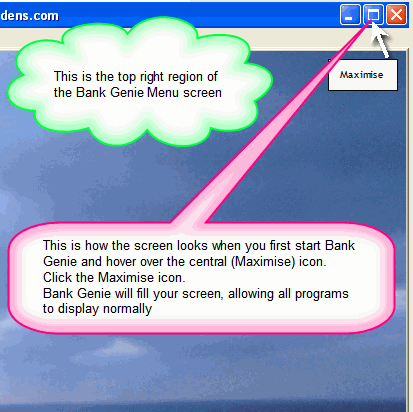
1) Maximise the Menu screen
- If you DON’T
have dual screen monitors
When you start Bank Genie, click the Maximise icon in the Menu screen.
Screenshot
It's
the icon just beside the X (close) icon at top right corner of the screen.
When maximised, the Show help balloons
checkbox should be visible at the bottom left corner of the screen, below the Exit
button.
This setting is saved when you close Bank Genie.
- If you DO
have dual screen monitors
When you start Bank Genie, the program should be located on your left monitor.
You can drag this to the right monitor if you wish.
Click on the Title bar and drag to top and left of your monitor.
Screenshot
Now Click on the outer edges of the Bank Genie and drag the screen to fill your monitor
These positions
and settings are saved when you close Bank Genie.
2) Edit the default Bank account
name
Click the Setup tab on the menu
Start the program Setup>Bank Accounts-BS403
You will see one My bank account - Edit me
account.
Screenshot
Click the Edit
button.
Screen BS403S02 appears.
Change the Bank Name to your own main Bank Account.
Click Save Changes
If necessary, add more Bank Accounts or Credit Card accounts using this program.
Tip: The first account you add becomes the Main account.
When you
manually add transactions (using program BS421 below) the program starts by selecting the Main account and displaying transactions in that account.
You can
change the Main account at any time - use BS403, select an account and click the button - Set as main account.
3) Closing Programs
Referring to this screenshot - As explained there are three methods for closing programs.
4) Add some Categories
Click
the Setup tab on the menu
Start the program Setup>Categories-BS420
Add some Categories.
You can make ONE category the default category (which will be automatically selected when you add transactions). To do this, Edit the category you'd like to be the default, get to screen BS420S02 and check the Default Category checkbox.
Tip: Make a Category called Miscellaneous and make this the default category to get started. The default Category will be automatically selected when you manually add transactions (using program BS421 below) but you can change as necessary before adding.
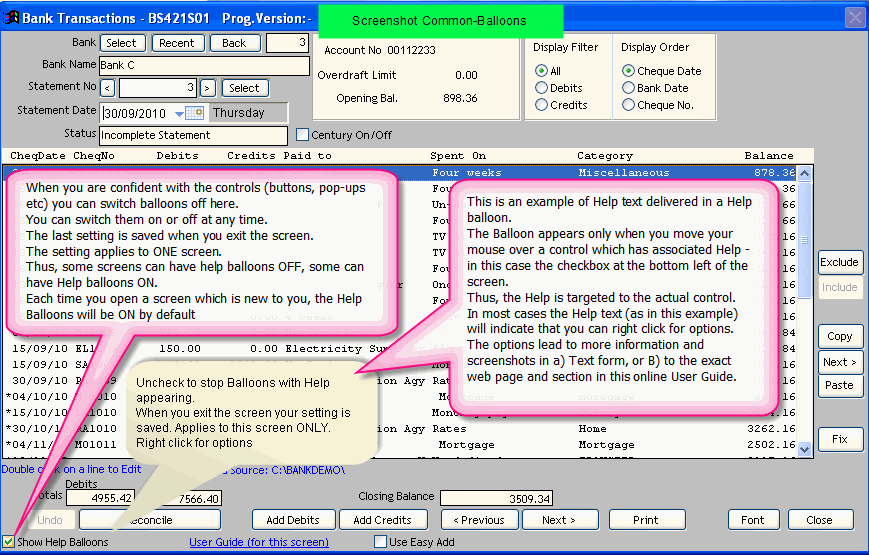
5) Exposing Help
Bank Genie has both Text help and an online User Guide.
Screenshot 1 Screenshot 2
Keep Show Help Balloons checked in new screens until you've found your way around. Do what it says in Balloons
when provided for a control.
If it says Right click, then right click on THAT control and you'll find immediate Text help, and a link to TARGETED help to
the User Guide.
Click the User Guide link at the bottom of each screen. Again, takes you to a Targeted web page on the User Guide.
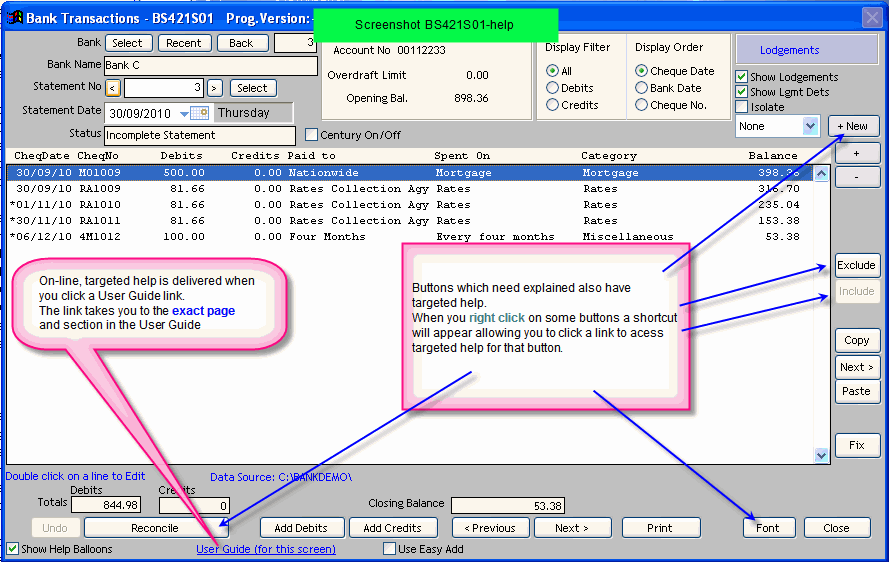
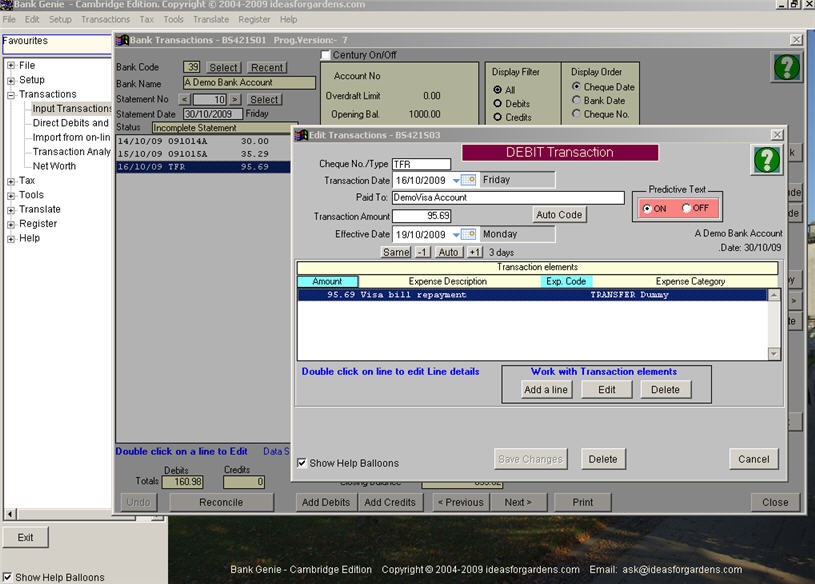
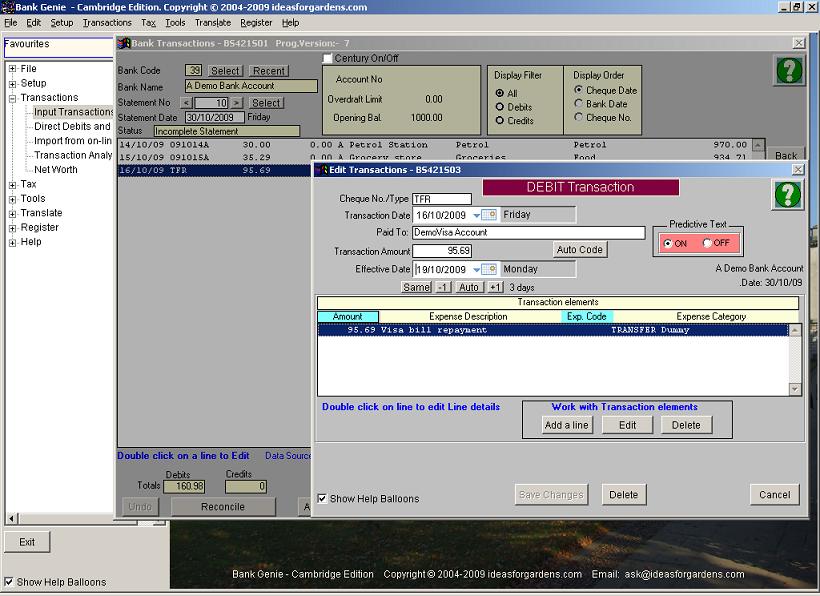
6) Add some transactions manually
Click
the Transactions tab on the menu
Start the program Transactions>Manage Transactions-BS421 The default Bank Account is selected
Screenshot
Click
the Add Debits button to add debits.
Click the Add Credits
button to add credits.
Use the controls on the initial screen BS421S01 to select another one of your Bank or Credit Card Accounts.
Add some transactions.
Tip:
Be sure to use the Help available when you right click on the
buttons:
Exclude, Include and Reconcile.
Bank Genie is designed to allow you to segment your data into Statements (as provided by Banks and Credit Card
providers). You can do this randomly if you wish, of course, but the segments allow you to manage the data better in BS421.
7) Choose a Font and Font size
Click the Setup tab on the Menu.
Start the program Setup>Preferences (
BS498 in BG Pro, BS497 in Bank Genie 4)
Screenshot
Note that you can change the Font and Font size.
The default is 8pt
Tahoma. The screens in Bank Genie look very well at this setting.
Change the font or make it bigger if you wish but if going to 12 point, you may need a wide
screen monitor to see all the text in some screens.
Don't exceed 12 point.
8) Play with the Transaction Analyser
Click the Transactions tab on the menu
Start the program Transactions>Transaction Analyser-BS408.
Screenshot
It's one of the power tools
of BG.
There are two tabs in screen BS408S01:-
- Transactions for this selection
and
- Selection Screen
Click Selection Screen
to manipulate the data to be extracted (Banks, Categories and Tags) then click the Go button.
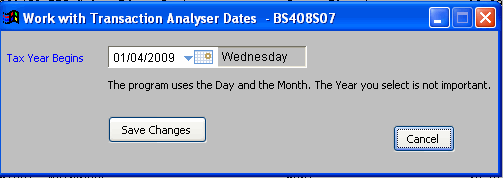
The Bank of date range buttons (TYR, LYR etc) can be configured using right click
e.g. if your Tax Year End dates are different to the default, right click on one of the TYR buttons.
Screen BS408S07 appears:
Screenshot
Change the date to suit your needs
9) Reports - using the Transaction Analyser
Click the Transactions tab on the menu
Start the program Transactions>Transaction Analyser-BS408.
In the initial screen BS408S01, bottom right,
note the Reports pop-up.
Screenshot
Use it to select various display options, then Print what you see.
Highly configurable.
10) Standing Orders, Direct Debits and recurring Payments
You’ve now covered the basics.
Now try these programs yourself (refer to User Guide for assistance if necessary):
Transactions tab>Direct Debits/Standing Orders-BS423 User Guide
and
its counterpart
Transactions tab>Process Standing Orders-BS429 User Guide
then:-
Transactions tab>On line banking transactions-BS412
User Guide
11) Tips - and things you should know
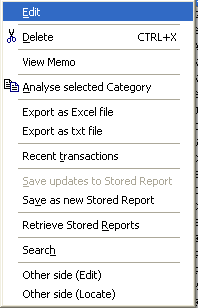
- Right click, right click!
You’ll find extra functionality and features when you right click on any controls which we feel
need an explanation.
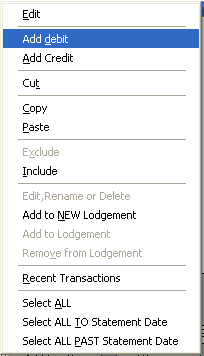
Be SURE to try right clicking on a transaction in the screens BS421S01 and BS408S01.
When you right click, a shortcut menu appears, with more options.
Screenshot- Shortcut menu in BS408S01
Screenshot- Shortcut menu in BS421S01 (Note that the shortcut options in this screen are tailored to the features you have selected in Preferences)
- Reconciling - the Bank Genie way (direct links to articles in the User Guide)
About reconciling
Reconciling a statement
The Exclude button
The Include button
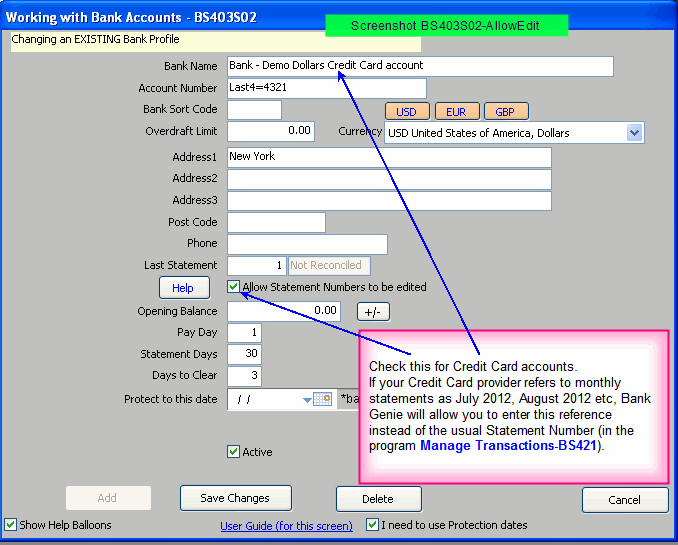
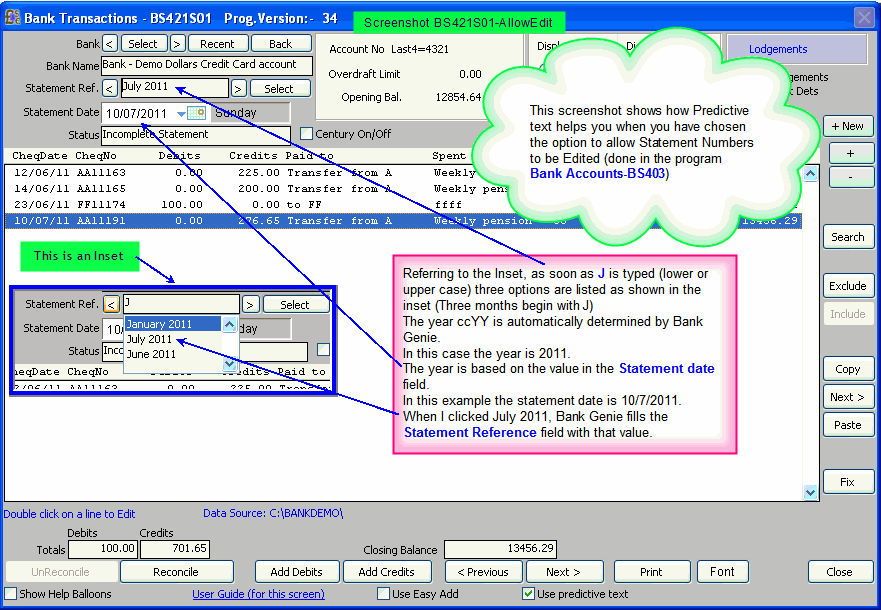
- Have you added a Credit Card account?
Be sure to read this:
Allow statement numbers to be edited
Setting
the option in BS403 - Screenshot
Using the feature in BS421 - Screenshot2
- Searching the data for a transaction
a) When using the program Transactions>Transaction Analyser-BS408.
In
the initial screen BS408S01, right click in the list of transactions.
A shortcut menu appears
Screenshot
Select
the Search option. Note the wide range of other options, of course!
(b) When using the program Transactions>Manage Transactions-BS421
In
the initial screen BS421S01, click the Search button to the right of the list of transactions.
- Stored Reports (known as Memorised Reports in Quicken)
Stored Reports can be created and recalled for repeated use in the program
Transaction Analyser BS408.
Right click on a transaction In the initial screen of
BS408.
Screenshot- Shortcut menu in BS408S01
Use the options Save as new Stored Report and Retrieve Stored Report
|
