|
Starting the program
On the Main Menu, click the Business tab then click:
P&L Reports - BS410
The initial screen BS410S01
appears
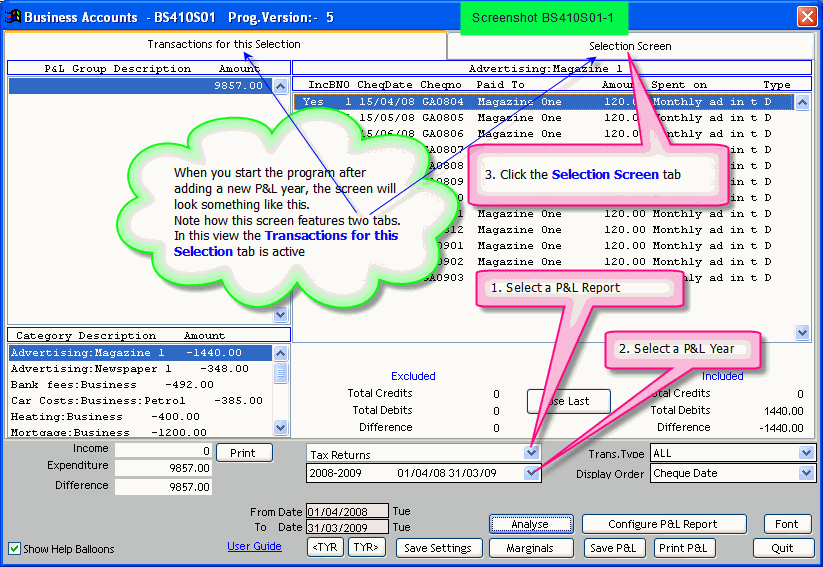
Screenshot BS410S01-1
In this section
Before using this program
Use the program P&L Years and Groups - BS409 to define the description, the structure and other elements of your P&L reports.
e.g. The P&L Years (and their start and end dates) defined in that program (BS409) are used in this program.
About the program
This program allows you to:
- accumulate transactions into accounting categories (referred to as P&L Groups in Bank Genie)
- print P&L reports
- output P&L reports to other data formats
- save the settings made to generate your P&L Reports as a Stored Report.
i.e. the Banks, categories and tags you select to generate the figures for each
P&L Report.
- select and review any P&L report by simply clicking a set of Prev/Next buttons.
- generate multiple P&L reports for any given year (See BS409).
NOTE: Screen BS410S02 is a pageframe with two tabs
Screenshot BS410S01-1
- Transactions for this selection
and
- Selection Screen
The tabs provide two screen “modes”.
When you start the program, the Transactions for this selection
tab is selected
Step 1 - Select a P&L report
Referring to Screenshot BS410S01-1 use the pop-up to select a P&L report system.
More info: Note how the pop-up is populated with the Report descriptions you defined using BS409
Step 2 - Select a P&L Year
Referring again
to Screenshot BS410S01-1 use the pop-up to select a P&L report.
More info: Note how the pop-up is populated with the P&L Years you defined using BS409.
Note that the From and To dates are set automatically to the dates you defined in BS409
These predefined dates cannot be changed in this program.
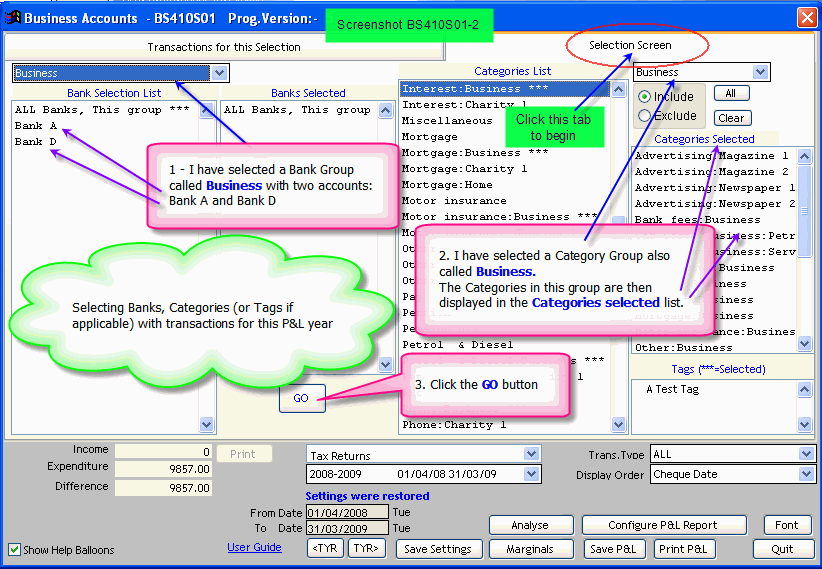
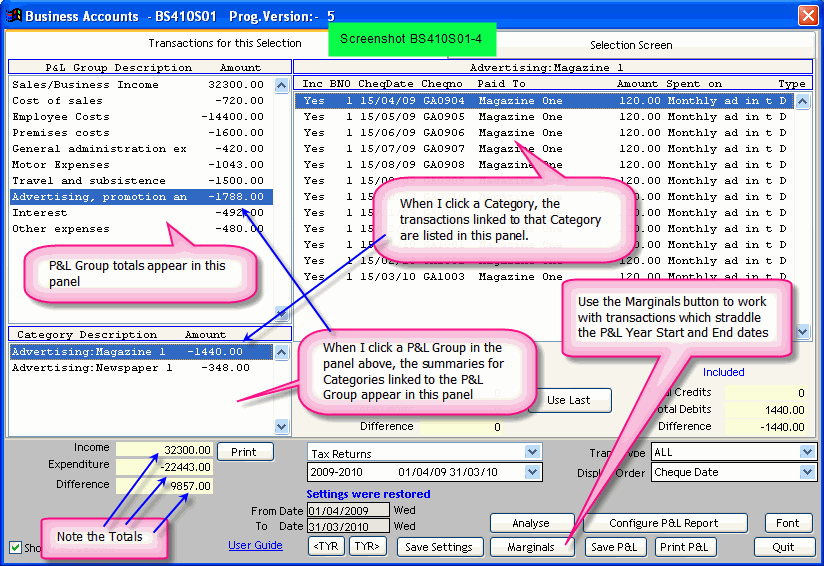
Step 3 - Select Banks, Categories and Tags
Referring again to Screenshot BS410S01-1 click the Selection Screen
tab.
The Selection Screen page appears.
Screenshot BS410S01-2
In the Selection screen:
- select All Banks, a Bank Group, or the individual Banks which contribute to the selected P&L report
- select All, a Category Group, or individually select the Categories which contribute to the P&L Report
- select a Tag(s) if transactions for this report are identified using this feature
- click the Go button
- the page similar to Screenshot BS410S01-1 reappears
i.e. the tab Transactions for this selection
is reactivated
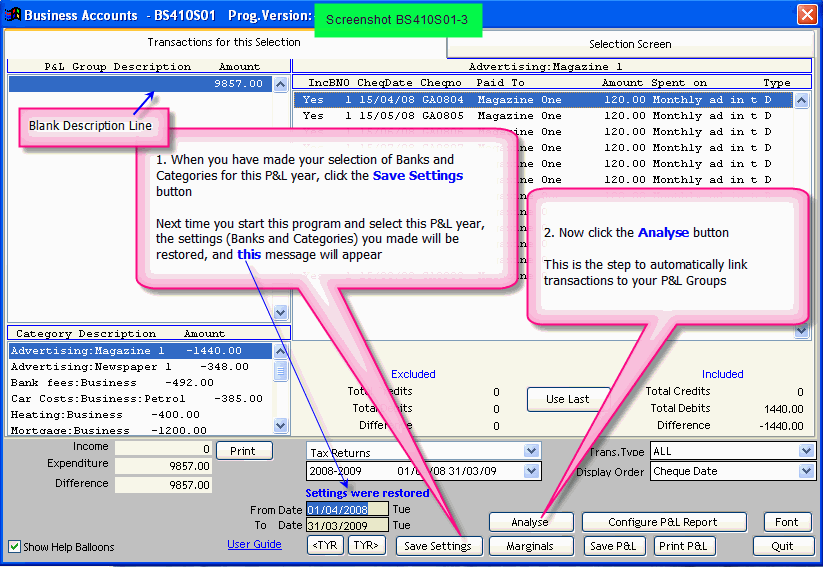
Step 4 - Save your settings
Referring to Screenshot BS410S01-3 click on the Save settings button
Bank
Genie saves the selections you have made in Step 3 as a stored report.
More Info: Your settings will be restored next time you select the same P&L
year.
This feature allows you to quickly select and display the same accumulation of transactions for any P&L year.
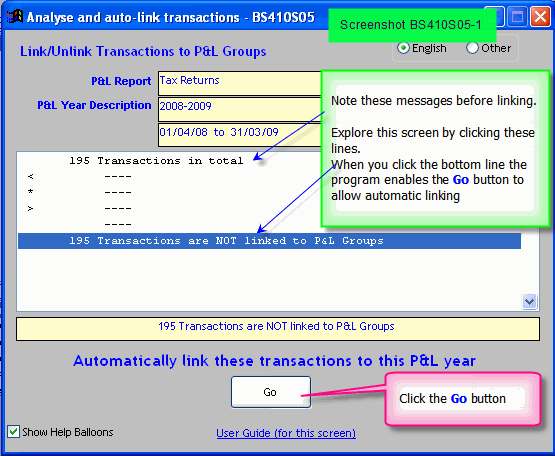
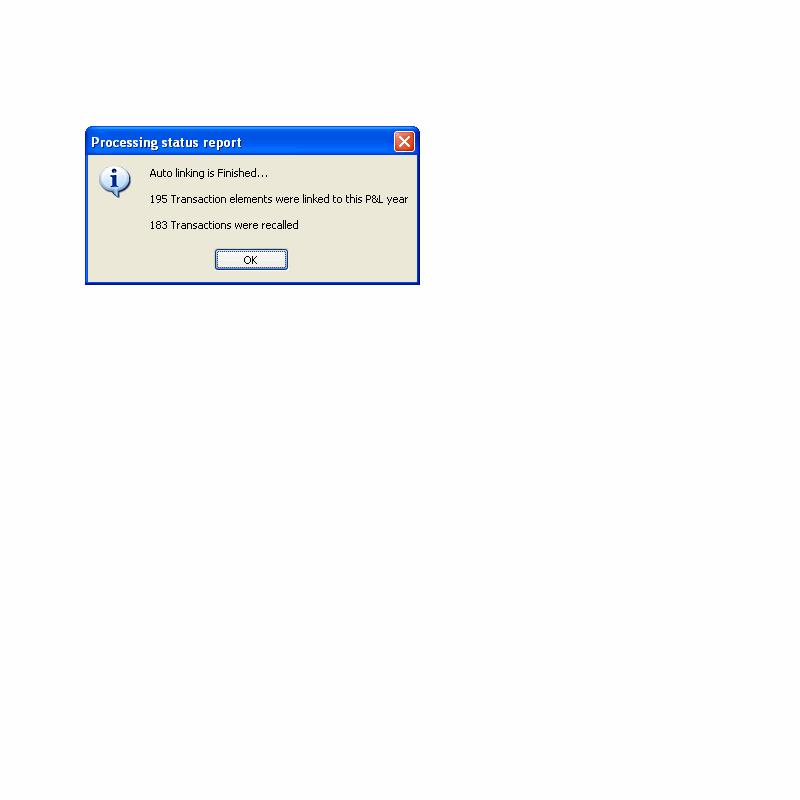
Step 5 - Auto link transactions to P&L Groups
Referring to Screenshot BS410S01-3 click on the Analyse button
Screen BS10S05 - Analyse and auto-link transactions appears
Screenshot BS410S05-1
In
that screen, the program automatically clicks the bottom line for you and enabled the Go button.
Click the Go button.
Click OK when the message as in this screenshot appears.
The initial screen BS410S01 re-appears.
Screenshot BS410S01-4
More info:
The simple looking screen Screenshot BS410S05-1 used in Step 5 features a number of power tools for
both linking and unlinking masses of transactions to your P&L Groups (in addition to providing overall statistics for the P&L year).
This is the first
application. The other power tools will be explained later in this section.
Manually linking transactions to P&L Groups
You may have occasion to manually link a transaction to a
P&L Group, or to change an existing link.
Double click on the transaction in screen BS410S01
Screen BS410S03 appears.
Use the popup in this screen to set the link for the selected transaction.
Note that in SPLIT transactions, you may have to select the correct element.
Step 6 - Refine your P&L report
The automatic
processing will link all your transactions to the correct P&L Groups for the selected P&L Year provided you have set up your P&L structure correctly in
BS409.
No doubt there will be exceptions!
e.g. You may wish to carry forward certain transactions into the following P&L Year
The tools to allow you
to deal with the exceptions are introduced in this section:
Refining your P&L report
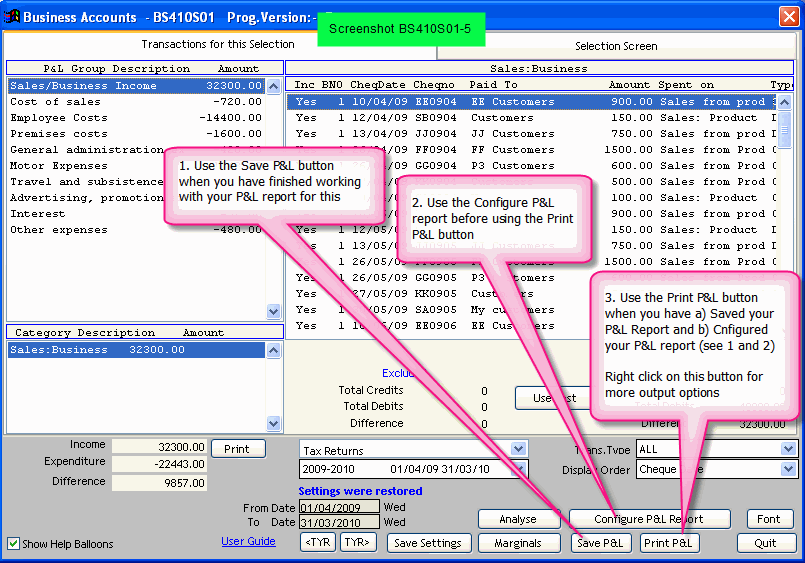
Step 7 - Save your P&L Report
Referring to Screenshot BS410S01-5
Click the Save P&L
button after you have finished work on your P&L report for this year.
The program saves the summarised P&L Groups figures.
Important:
The data saved in this step is used when you proceed to print your P&L Report.
If, at some later stage, you
add, edit or delete transactions to or from the selected P&L year, the saved data is not affected.
Thus, at any time, you can re-print a P&L report to
provide the original figures which were perhaps submitted for taxation purposes.
You can use the Save P&L
button as often as necessary. The saved figures are merely refreshed.
Step 8 - Configure the text for your P&L Report
Referring to Screenshot BS410S01-5
Click
the Configure P&L Report button. Screen BS410S04 appears
Screenshot BS410S04-1
Enter
data in the fields provided to personalise the title, currency and footer for your P&L Report.
You may have to experiment. Enter data, print your report,
and enter this screen again to amend the data as necessary.
Step 9 - Print your P&L Report
Referring to Screenshot BS410S01-5
Click
the Print P&L
button
A sample P&L report is shown in Screenshot BS410-PL1
Tip:
Initially, right click on the Print P&L button and choose the option Print Preview
Identify the text you entered in Screenshot BS410S04-1
Go back to the Configure P&L Report sas necessary to personalise the output.
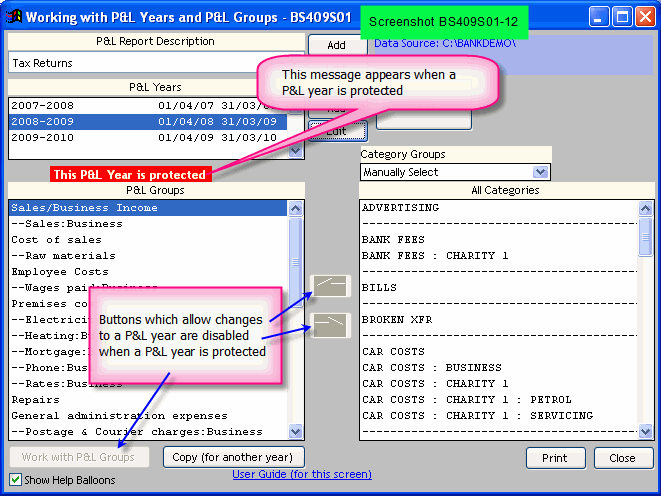
Step 10 - Protecting a P&L report for a P&L Year
Referring to Screenshot BS409S01-11
- Start the program BS409
- Select the P&L year to be protected
- Click the Edit button shown
- in screen BS409S11, check the Protected checkbox
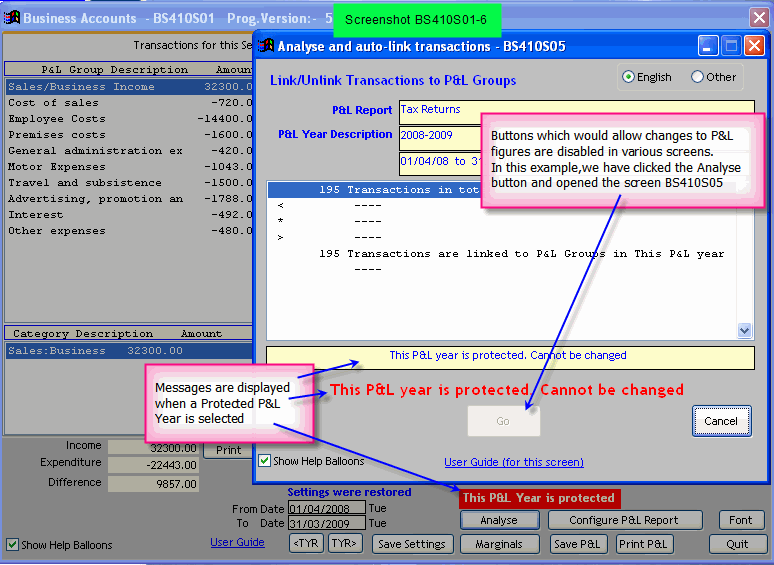
When a P&L year is protected:
|
