|
Starting the program
On the Main Menu, click the File tab then click:
Backup - BS491
The initial screen BS491S01 looks like this immediately after installation:
Screenshot
The initial screen BS491S01
looks like this after you have done at least one backup:
Screenshot
In this section
About the program
This program allows you to create a backup of your Bank Genie data files.
- You can also create a new folder for your backup within the program.
See Adding a Data Location Record
- You can backup to an existing folder (created using this program or standard Windows tools)
This program makes use of your Data Location Records to provide vital information about the folder you are backing up from, and the folder you are backing up to -
showing backup and restore history for the data in each data location.
This feature is designed primarily to allow users to rotate their
backups.
Example: You may wish to keep a history of 4 previous backups. You could call the backups Backup1 to Backup 4. After doing Backup1 (first) to
Backup4 (last), you would then start overwriting your Backups, beginning with the oldest - Backup1, then Backup2 etc.
This program shows you the backup
history and is designed to list your previous backups in the order oldest first to most recent last.
When you start the program (after doing more than one
backup) Bank Genie automatically sets the Backup TO folder to the oldest backup, ready for you to begin your next backup.
Use the Backup Date option in the
Listing Order radio button control
When you do a backup, a record is added to the History log.
Bank Genie also creates Database Stamps in both a) the Backup TO
database and the Backup FROM database with vital activity details.
Screenshot
Unlike the History log, Database Stamps travel with the database.
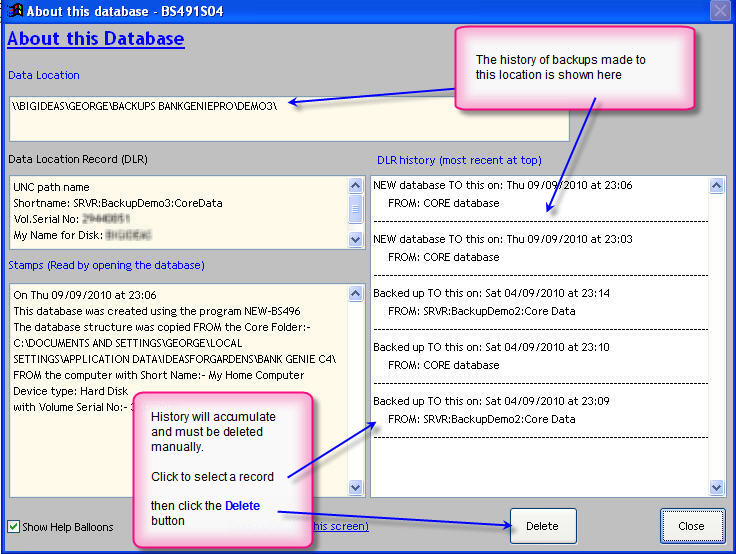
The stamp information can be viewed on any
computer which has Bank Genie Pro installed, by using any program which allows access to the screen About this database - BS491S04
More info:
Bank Genie keeps track of all your backups using Data Location Records. These are shared by other file handling programs in the system - e.g. Open - BS426,
Restore - BS493, Pack - BS492
Once you have created a backup, you can view the contents at any time using the program Open- BS426. Once opened, the database
(your backup) can be explored as normal using all the programs in Bank Genie.
Your first backup and adding a Data Location Record
Click the Get a folder button as shown here
Screenshot
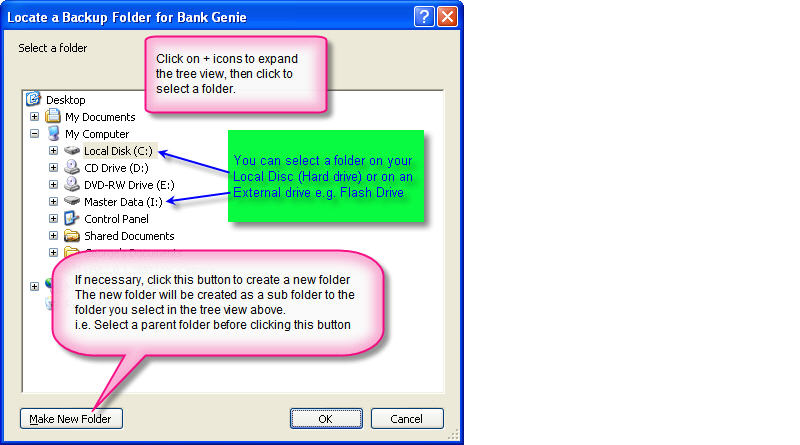
Screen GA491S03 appears
This screen allows
you to find an existing folder or create a new folder on the drive of your choice for your backup.
This is the first step in creating a Data Location
Record.
This screenshot takes you through the other simple steps:
Screenshot
If you wish to create a new folder, click the
Get a Folder button
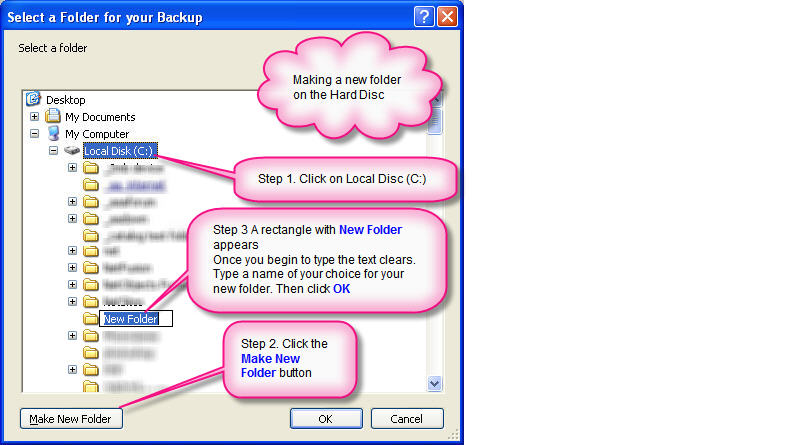
A Windows dialog box appears
Screenshot
Select
an existing folder, or create a new folder for your backup
The steps to create a new folder are described in this screenshot.
Screenshot
When you click Add (back in screen GA491S03) a Data Location Record is created
and control returns to the initial screen.
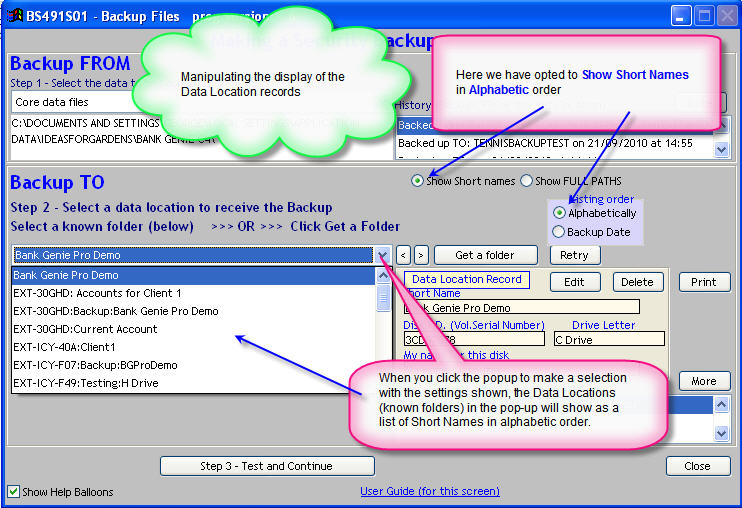
Bank Genie shows the Shortname for the Data Location Record in the popup
Screenshot
In this demonstration,
I have created a folder with:
- Folder path and name
I:\BANKGENIEBACKUPS\DEMOBACKUP\
The folder DemoBackup is a sub folder of BankGenieBackups on my Flash drive
- Shortname: Flash-B6D:DEMO BACKUP
My naming system is Flash-B6D is a flash drive. The
first 3 characters of the Volume Serial Number of the Flash drive is B6D. Demo Backup is the description of the backup data
Other suggestions for Short Names:
HD: Backup1
My naming system is HD= Hard disc, then a description for the backup
Click the Step 3 Do Test
button.
Bank Genie tests the integrity of the files you are backing up.
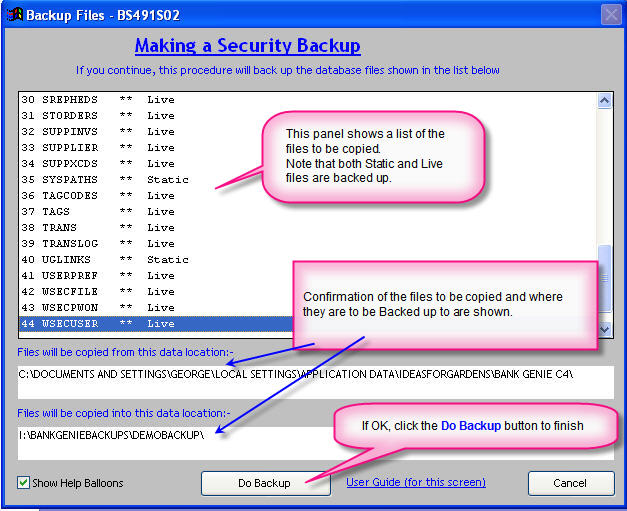
If files test OK, screen BS491S02 appears to confirm your selections.
Screenshot
Click the Do Backup
button to finish the backup
Ongoing Backups
After you have done your first backup, the initial screen will look like this
Screenshot
In Step 1, you are allowed to select a source of files for the Backup.
Normally this will be the Core data
files.
If you have another database Open, then that database will appear selected, ready for you to proceed.
Step 2 - Select a data location to receive the backup
Referring to the same Screenshot
In Step 2, select a Data location to receive your backup, or Find a folder to do your backup to a new
location.
If you have a number of Data Locations,
When you click the Backup Date
option in the Listing Order
radio button control Bank Genie attempts to place the data folders (listed in the pop-up in Step 2) in the order you are most likely to select
- Unused (but known) folders appear at the top of the pop-up list
i.e. if you create a new DLR, it will appear on top of the list
- Backups come next, in the order Oldest to most recent.
This should be useful if you are rotating your backups (explained in About Backups)
- Databases created using the program New - BS496 appear at the bottom of the list
since it is unlikely that you will use a folder with a New database to
receive your backup
When you have made a selection, click the Step 3 - Do Test
button.
Bank Genie tests the integrity of the files you are backing up.
If files test OK, screen BS491S02 appears to confirm your selections.
Screenshot
Click the Do Backup
button to finish the backup
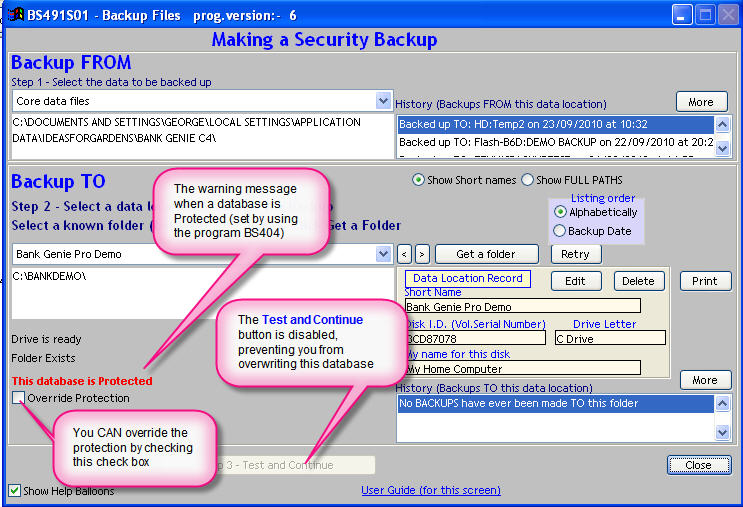
Database
Protection
Bank Genie has a special feature to help prevent LIVE DATA databases from being destroyed by accidentally overwriting with a backup (and
other database management programs).
Database protection can be set using the program Set Database Protection - BS404
When you
select a Protected database using this program a warning message in red is displayed
Screenshot
You can override the protection by checking the Override Protection checkbox
Features in this program
Show Short Names and Show FULL paths
A set of radio buttons with two options
This control is described in this topic in the Common Controls section
Use this control in conjunction with the
Listing Order radio button controls.
Screenshot
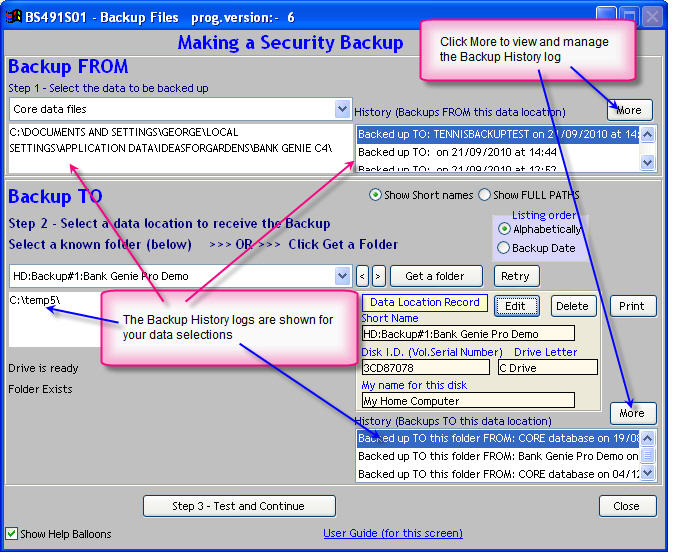
Backup History
When you select a data source in Step 1 or a Data
Location in Step 2, the History is shown for Backups made from that source
Screenshot
Similarly, when you select a Data
Location in Step 2, the History is shown for Backups made to that location
The More buttons (More History):-
To manage the History log, including Restore and Creation records, click the
respective More button as shown in this screenshot
Screen
BS491S04 appears
Screenshot
This screen is also used to manage history records.
History must be deleted manually as shown
in the Screenshot
Drive not ready:-
The value of Data Location Records are apparent
when you attempt to do a backup to a device which is not ready.
Bank Genie will display a warning message if you happen to select a Data Location Record which
points to an external drive and that drive is not plugged in to your computer.
Screenshot
Bank Genie prevents you from
continuing in such a case by disabling the appropriate button.
The Retry button
When you attempt to select a Database Location Record from the popup, and that database is on a device which is not connected, a Warning Message in red
will appear on the screen saying:
Drive is not Ready or Invalid
Screenshot
In this state you cannot proceed with the
backup or restore (the Step 3 Do Test
button is disabled).
Connect the device (External drive, Flash Disk etc) and click the Retry
button.
If the device Volume Serial Number (VSN) matches the VSN in the Database Location Record then the warning message will disappear and you can continue with the backup.
This feature is a good example of the value of Database Location Records in relation to removable disks.
My name for this disc (Information field)
This field shows the name
you entered for this disk when you created this Database Location Record
Volume Serial Number (Information field)
Each device (hard
disc, external disc, Flash Drive etc) has a unique Volume Serial Number.
Bank Genie automatically finds this information for you when you set up your Data
Location Records.
The Volume Serial Numbers are used by Bank Genie to positively identify the devices (containing your Data) which you attach to your
computer.
The Drive Letter field (Information field)
External disks (and Flash drives) which are removable do not always pick up the same Drive Letter when connected to your computer.
When you select a Data
Location Record, Bank Genie does a scan of all hardware attached to your computer looking for a device with the matching Volume Serial Number.
If the device is
found, the current Drive letter is shown in this field.
The path for a local computer or Flash drive begins with a drive-letter, followed by a colon
e.g.
C:, F:, etc
Drive letters do not apply to Servers which may use UNC paths instead of drive letters.
A UNC path begins with \\
A UNC path looks something
like this:
\\ServerName\ShareName\MyFolder\MyData\
UNC paths are discussed in the User Guide
Managing Data Location Records
The Edit button - Editing a Data Location record:
After you have become familiar with Data Location Records
(DLR) , you may wish to edit the Short Names or Disk Names to tie up with your identification system
- click the Edit button in screen BS491S01
See this screenshot
- Screen BS491S03 appears
- Edit as required
In screen BS491S01, for any Database Location Record (DLR):
- You can change the Short name (for the DLR)
- You can change the Disk name
- You can change the folder path and folder name provided you have NOT done a backup, restore or created a new database in that folder.
- You can NOT change the folder path and folder name AFTER you have done a backup, restore or created a new database in that folder
- You can NOT change the Volume Serial Number. This number is assigned by the manufacturer of the device.
The Delete button - How to Delete a DLR
- click the Delete button in screen BS491S01
See this screenshot
- Screen BS491S03 appears
- Click the Delete button in that screen
You can delete a Data Location Record even if it has been used for backups.
DLR History will also be deleted
How many backups should I keep?
Read this article: About backups
|
