|
Using your own photos with Bank Genie
When you use the Picture arrow keys in
Treeview mode in Bank Genie, the program looks in a known folder location for photos.
To use your own photos, you simply copy a photo into the folder used by Bank
Genie.
We will refer to this folder as the IMAGES FOLDER
.
Any photo copied into the IMAGES FOLDER
will work, and the full image detail will be shown.
However the image may need to be edited to avoid distortion
The following topics explain the process:
- Locating the Images folder used by Bank Genie
- How to create a correctly proportioned photo for use with Bank Genie
Locating the Images folder used by Bank Genie
The location is
different for each installation.
To locate the IMAGES FOLDER in your installation, click the Help tab on the menu, and start the program About Bank Genie - BS400
Screenshot
The Core Data folder is shown in Item 6
The IMAGES FOLDER used by Bank Genie is located in a sub folder of the Core Data
folder. Sub folder name is images.
Thus if your Core data folder as shown by BS400 is:
C:\DOCUMENTS AND
SETTINGS\user\LOCAL SETTINGS\APPLICATION DATA\IDEASFORGARDENS\BANK GENIE C4\
then the IMAGES FOLDER is:
C:\DOCUMENTS AND SETTINGS\user\LOCAL SETTINGS\APPLICATION DATA\IDEASFORGARDENS\BANK GENIE
C4\images
How to create a correctly proportioned photo for use with Bank Genie
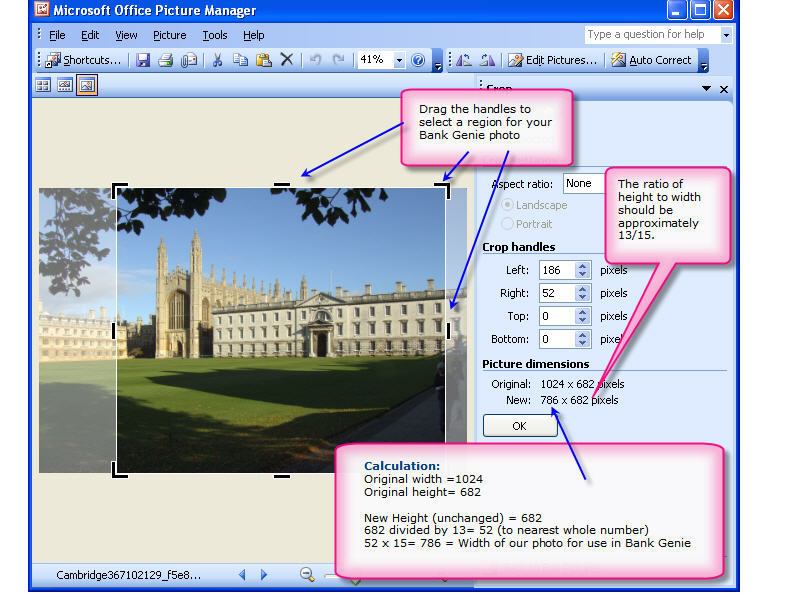
To avoid image distortion, you simply crop a suitable photo to the aspect ratio used by Bank Genie.
The optimum aspect ratio is 13x15 i.e. the Height to Width ratio is
13/15 and the height is smaller than the width.
- Either:
a) Make a copy of the original using the program My Computer
Save the copy in the IMAGES
FOLDER as discussed above
OR (a safe way)
b) Edit the original using using Microsoft
Office Picture manager
Under the File tab, click Save As
Navigate to the IMAGES FOLDER as discussed above
Enter a NEW
name for the file and click Save
EXIT the program (thus closing the original - do not Save when closing)
Tip (applies to either method - a or b):
In this example, Ive copied a photo named Cambridge367102129_f5e8abdc91_b.jpg and given the copy the file name:
Cambridge367102129_f5e8abdc91_b-cropped.jpg
The photo was taken by Eric Hardy, High Wycombe, England
- Edit the NEW image you created (in this example IMG_1386-Label-8x10) using Microsoft Office Picture manager
Make sure you are editing a photo in the IMAGES FOLDER as discussed above, and make sure it
is a copy of your original
- Click the Picture tab on the menu, then click Crop
Screenshot
This may differ in your Photo
Editor
- You can now select a region of your photo to use as the image for a label.
Screenshot
- Save your changes
WARNING: Once you save your changes, you can NOT undo the cropping operation, hence our reminders that you use a copy of your original.
- Start Bank Genie
Use the arrow buttons to browse through the images until your personalised photo appears.
You may wish to click the Set button to make this the default photo
|
